- Short introduction to the basics of Web
- Waltz
- Getting started as a developer
- WaltzPlatform reference guide
- High level architecture overview
- WaltzPlatform API
- UIBuilder
- Tango device model
- Tango REST API js adapter
- Utility models and helpers
- OpenAjax events
- platform_context.create
- platform_context.destroy
- platform_context.set_rest
- platform_context.set_user_context
- tango_webapp.tango_host_loaded
- tango_webapp.rest_send
- tango_webapp.rest_failure
- tango_webapp.rest_success
- tango_webapp.device_loaded
- tango_webapp.device_open
- tango_webapp.device_configure
- tango_webapp.device_delete
- tango_webapp.device_view
- tango_webapp.device_view.update_attr_config
- tango_webapp.attr_add_to_monitor
- user_action.log
- platform_api.ui.initialized
- platform.user_logout
- user_context.create.as_existing
- user_context.destroy
- user_context_controller.found
- user_context_controller.update
- user_context_controller.destroy
- user_context_controller.add_tango_host
- user_context_controller.delete_tango_host
- tango_rest_api.is_alive
- tango_rest_api.is_not_alive
- Unit and functional testing
- Packaging and deployment
- Resources
We shall start this developer guide with a super short introduction to the basic web technologies which are used in Waltz. If you don't need this, please, skip this part and go directly to the Waltz description.
Short introduction to the basics of Web
Let's start with Client-Server architecture which looks like this at the first glance.
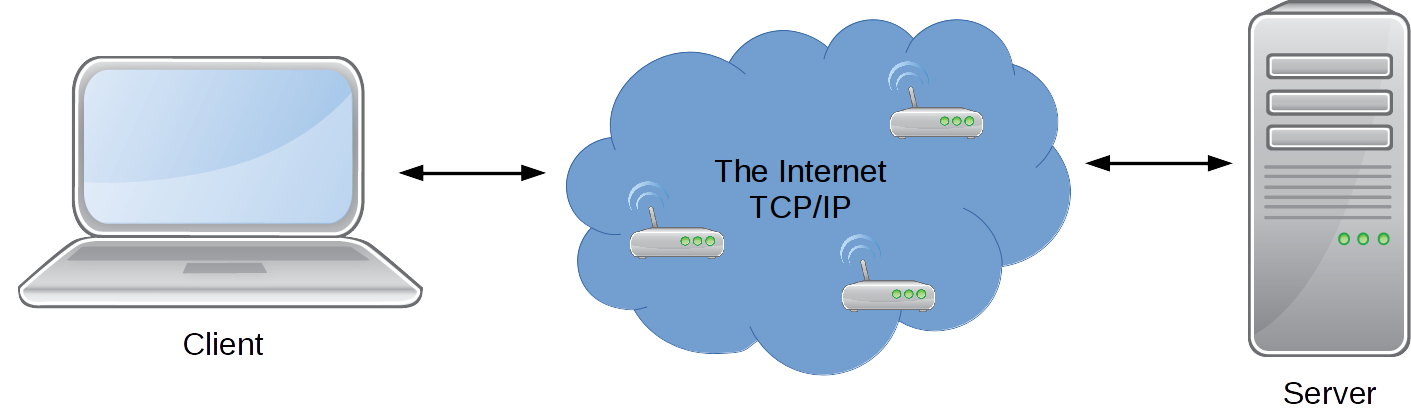
In our case we consider Browser as a Client and if we deep a bit, we get:

Browser via sends HTTP request to a specific URL. Server returns HTTP response that represents static/dynamic data on a local server system.
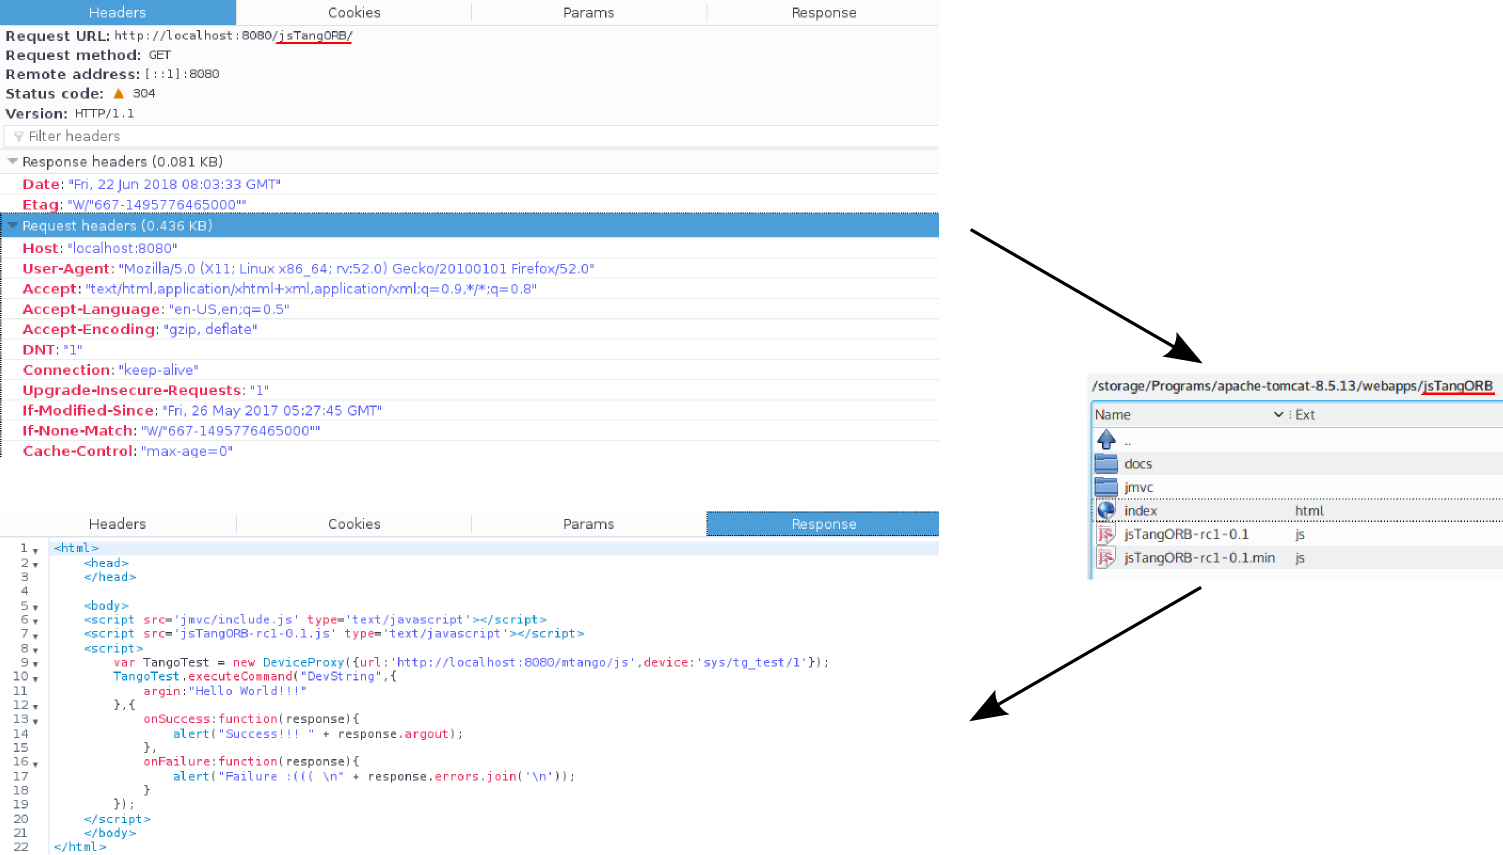
For example, Request URL “http:localhost:8080/jsTangORB/” means jsTangORB folder on the Server which returns as response index.html
Apache Tomcat (a Java HTTP web server environment) and Servlet (a Java program that extends the capabilities of a server)
are both middleware. Apache Tomcat binds itself to HTTP port and Servlet transforms API,
so you don't need to keep in mind socets and ports.

REST API is philosophy, a set of constraints.
It uses structured requests: * http://{host}/{app}/{api}/{version}/{collection} e.g. http://localhost:8080/my-app/users * http://{host}/{app}/{api}/{version}/{collection}/{item} e.g. http://localhost:8080/my-app/users/123 * http://{host}/{app}/{api}/{version}/{collection}/{item}/{sub-collection}
It adds semantic to HTTP methods: * GET → get resource * POST → create new resource * PUT → update resource * DELETE → remove resource
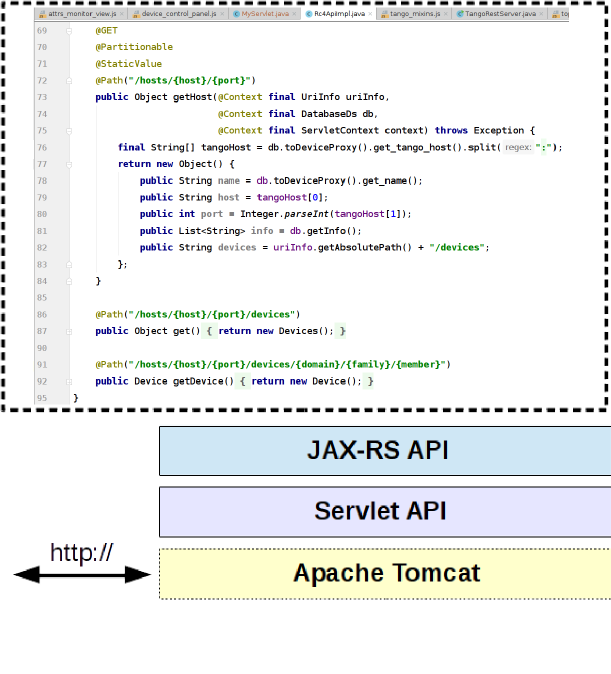
JAX-RS – is a Java programming language API specification for server/client side REST implementation.
Using previous diagrams JAX-RS will take the following place (note annotations on the code):
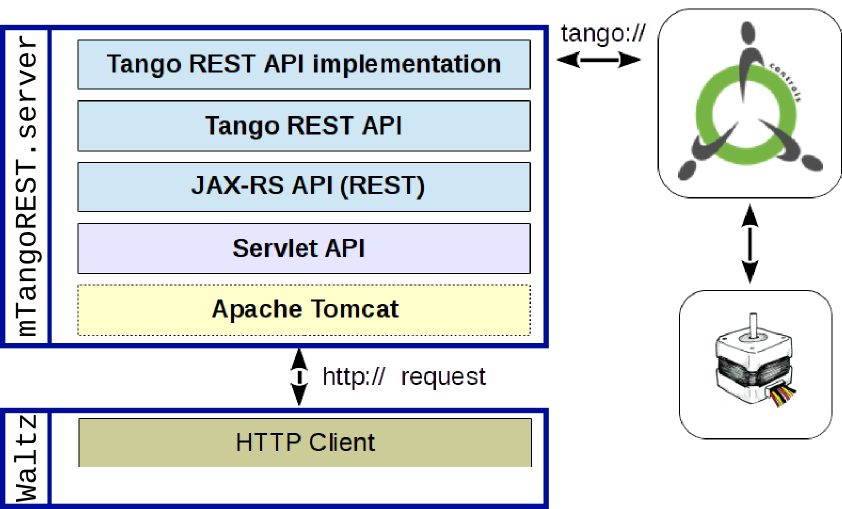
Tango REST API is a RESTful view on Tango Controls. It is just a SPECIFICATION!!! http://{host}/{app}/{api}/{version}/{collection}/{item}/{sub-collection} → http://host/tango/rest/rc4/hosts/tango_host/10000/devices
So putting it all together, we get the following diagram:
Waltz
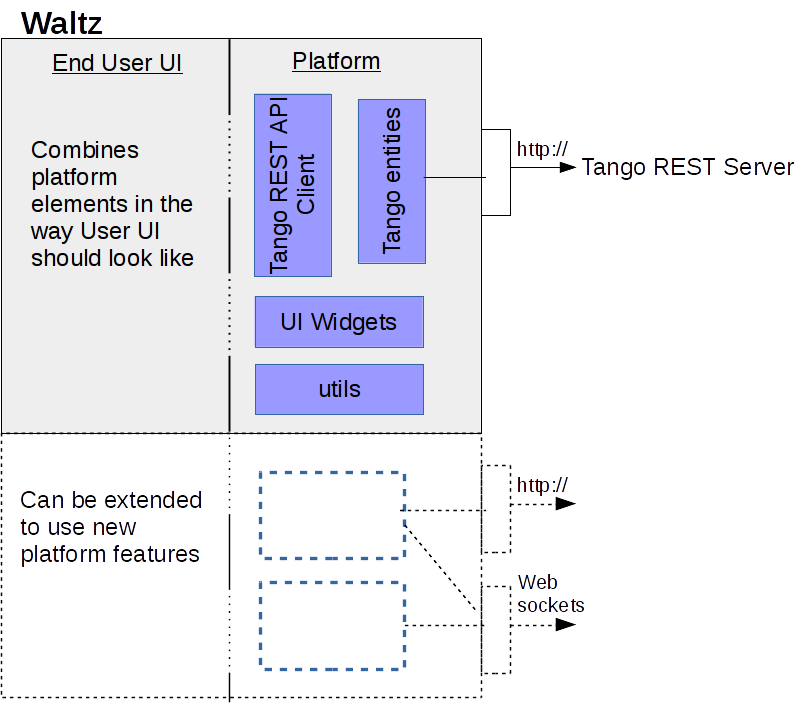
From the developer point of view it is important to understand the following: Waltz per se is a web application built on top of WaltzPlatform. WaltzPlatform is a framework for Tango web applications (the framework may be extended to non-Tango applications as well, see architecture).
Waltz application
Waltz application is a web application built using WaltzPlatform. Waltz is distributed as .war file.
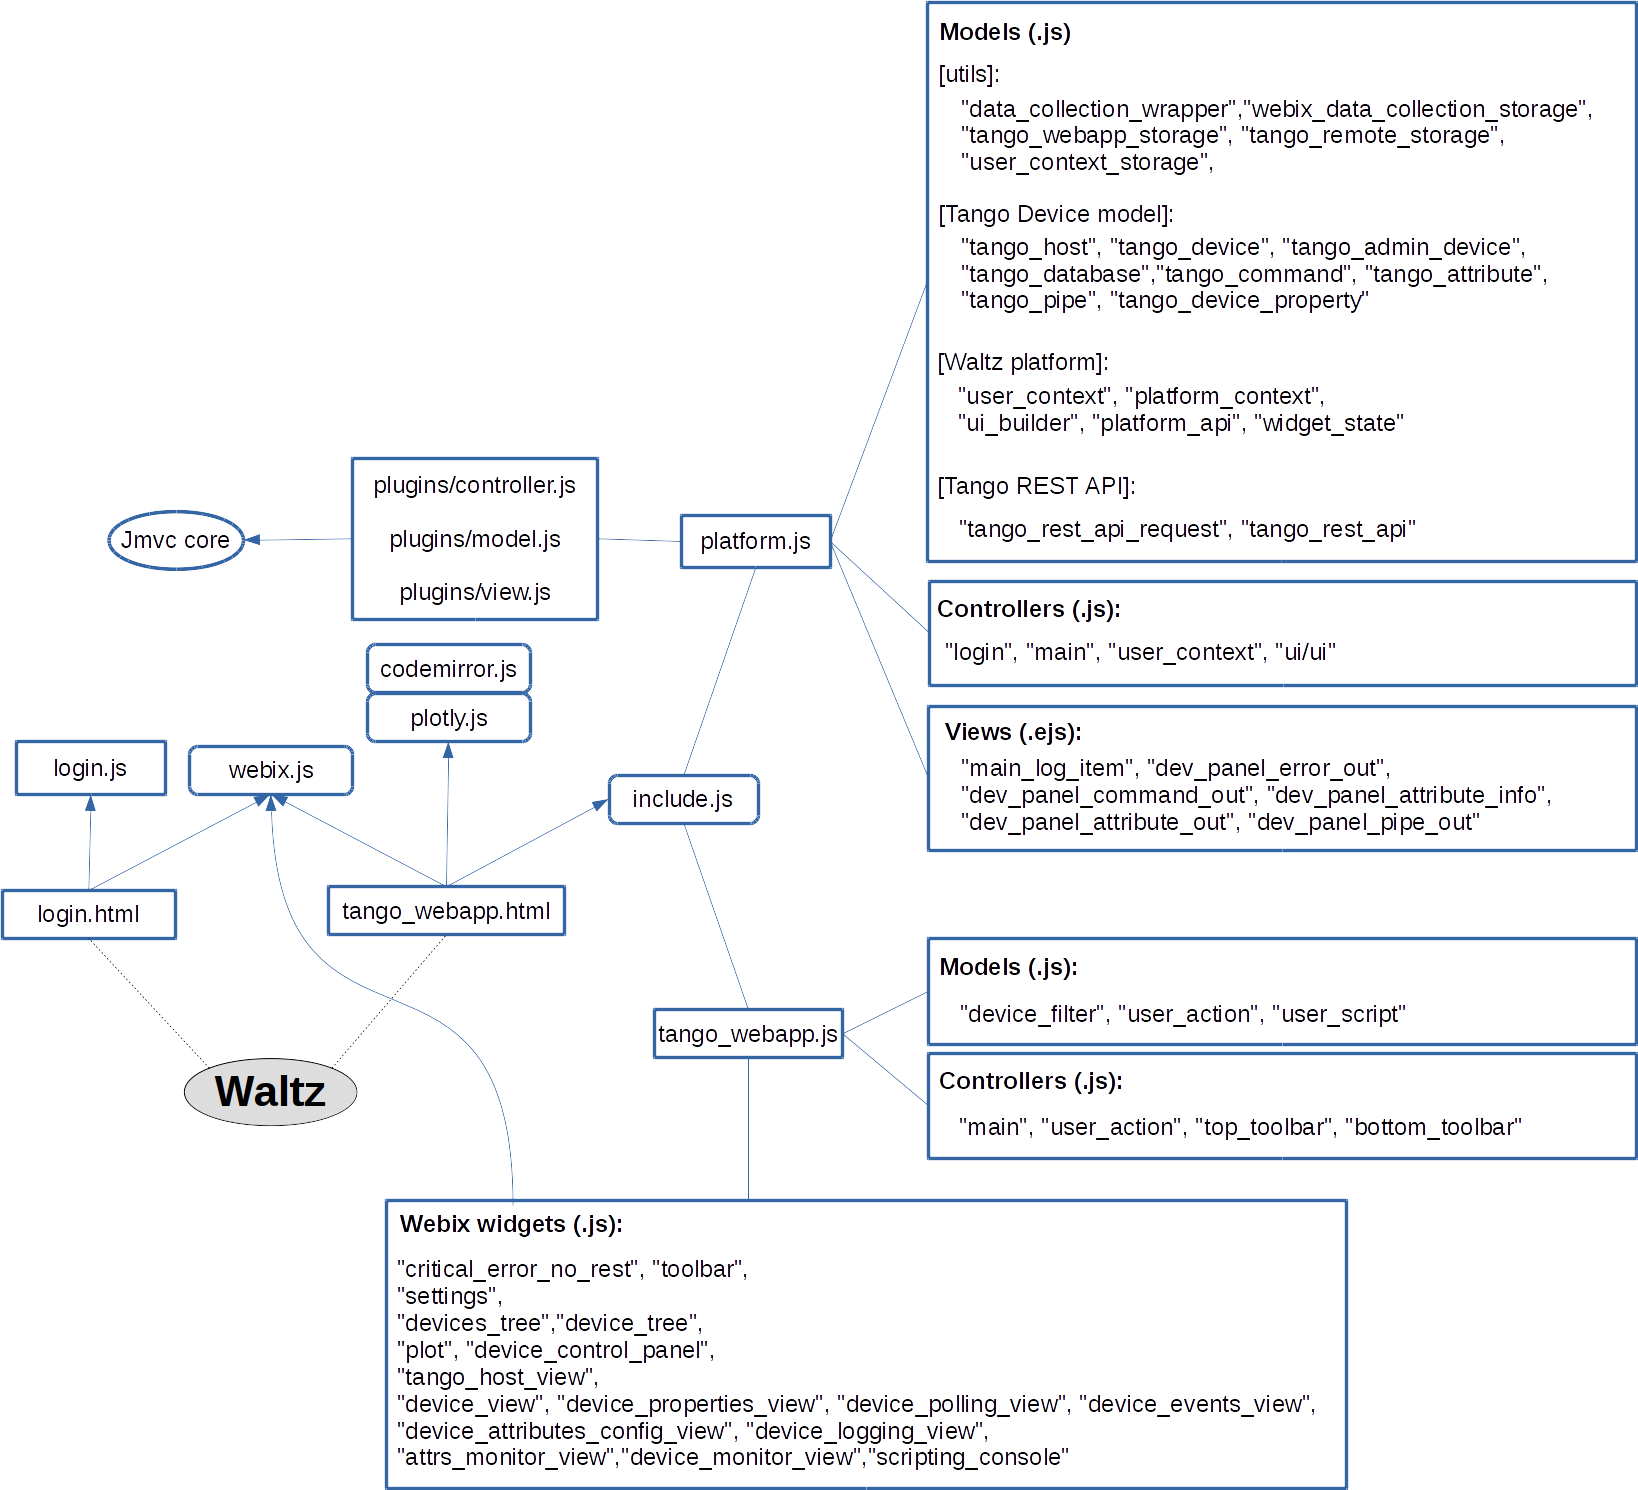
WaltzPlatform
WaltzPlatform is a framework on top of JavaScriptMVC-1.5.x and webix. WaltzPlatform provides building blocks (API, UI components) for developing custom web applications. WaltzPlatform uses Tango REST as one of the backends and therefore allows interaction with Tango Controls.
WaltzPlatform can be extended to non-Tango backends as well:
WaltzPlatform is distributed as git repository (forks or source code archive)
Waltz itself consists of 2 parts: platform and end user UI. If you need, you can extent platform part, e.g. at the moment Waltz has Tango Controls data source, but it can be extended to EPICS.
Frankly speaking, as a frontend developer you don't need to know the server part. Here we would like to give you a short overview to let you know how it is organized:
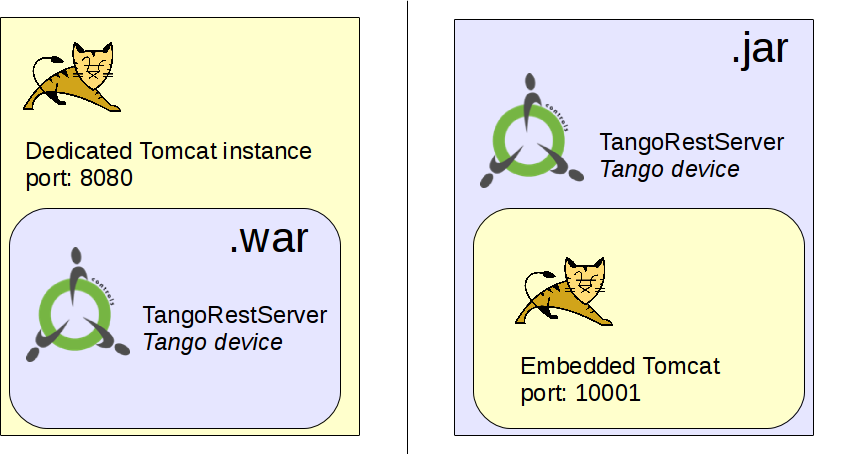
WaltzPlatform Tango REST backend (mTangoREST.server)
mTangoREST.server - is a Java implementation of a Tango Controls REST API specification. If you need C++ version, please, visit RestDS page.
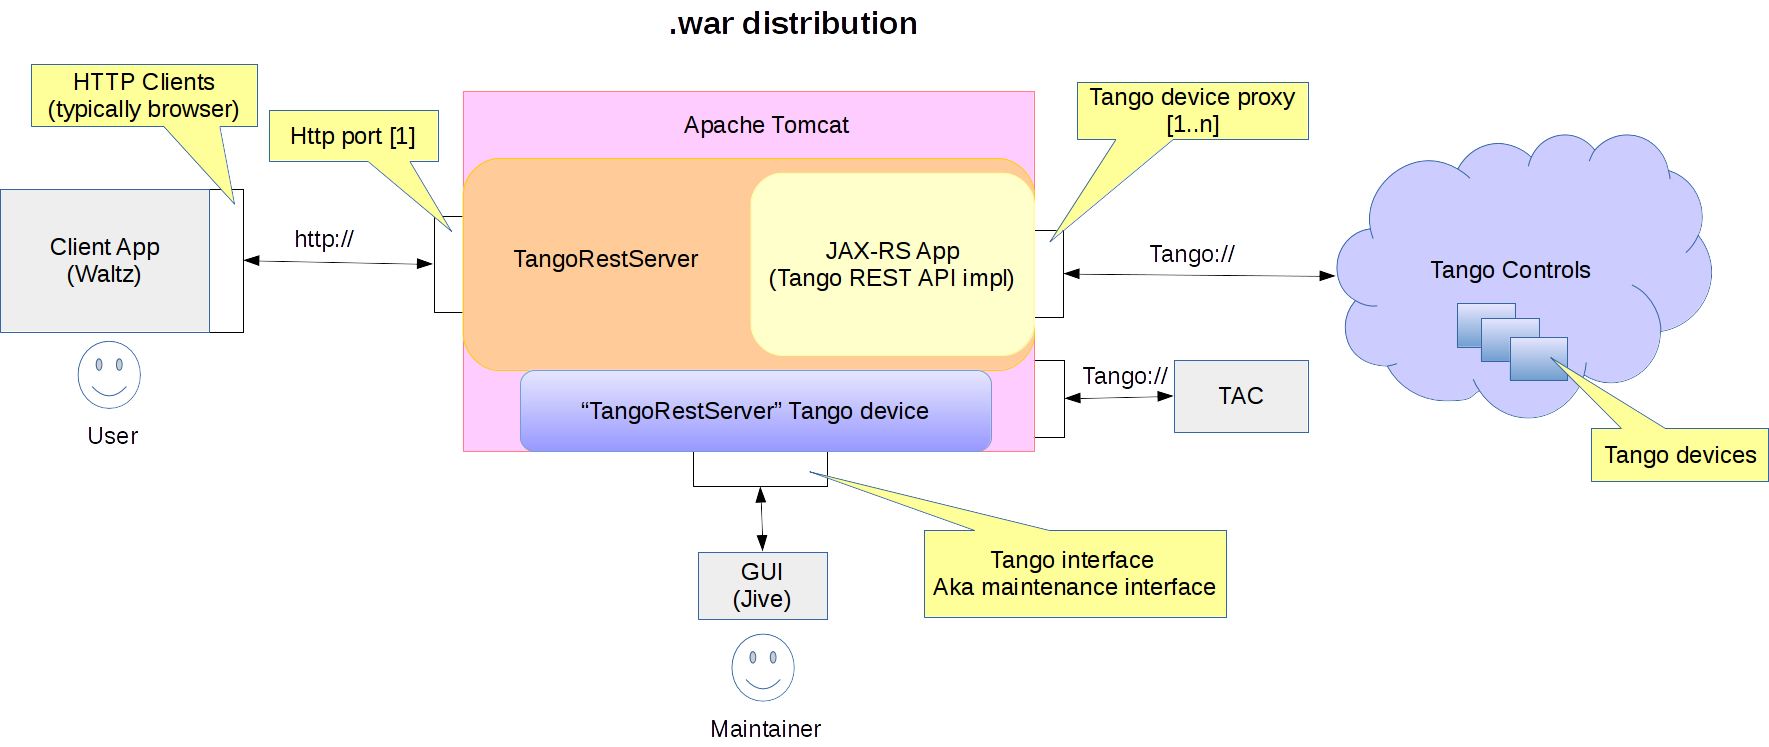
mTangoREST.server has two distributions: .jar and .zip
The difference is shown in the following diagram:
A high level overview is presented in C&C diagrams.
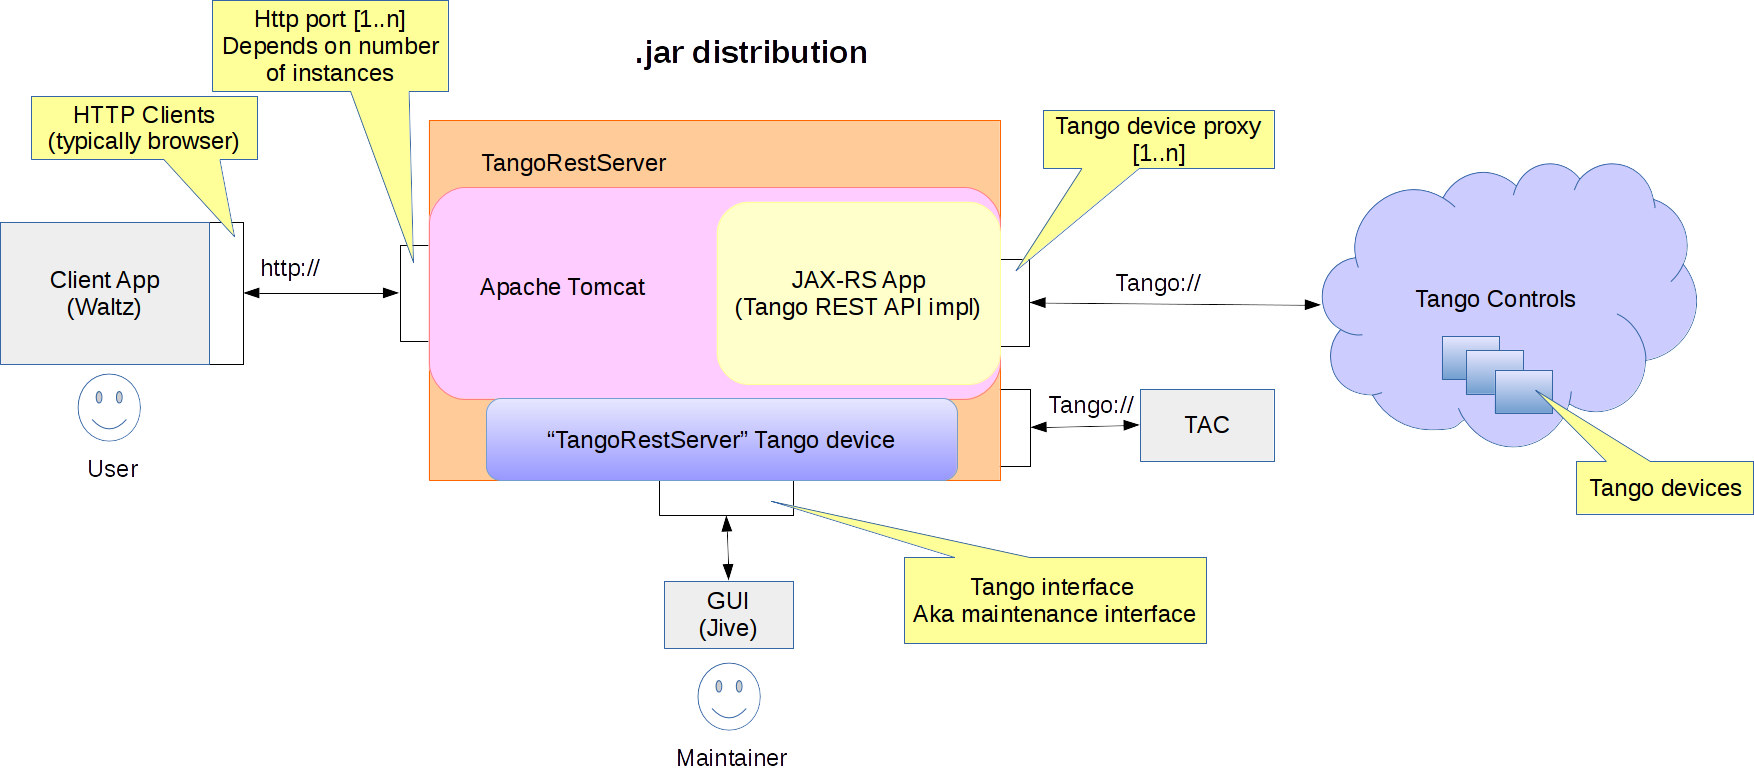
.jar * For development/small production deployment * Standalone Tango device * Integration with standard Tango tools (Astor) * Using launch script * Dokerized
.war * For production deployment: - Allows fine Tomcat tuning - High load (1K-10K users) - Standard enterprise infrastructure * Embedded Tango device - Configuration in WEB-INF/web.xml
Pipeline of the mTangoREST.server request can be presented like this:
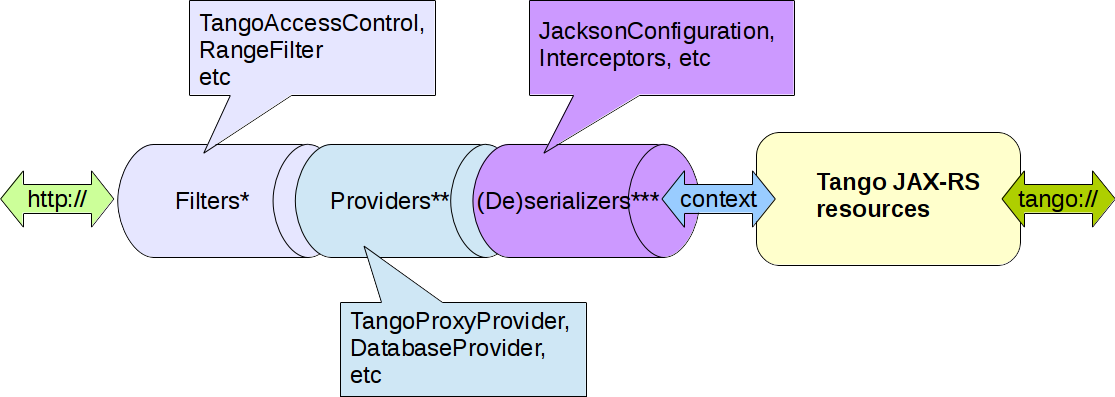 Where
* org.tango.web.server.filters;
Where
* org.tango.web.server.filters;
** org.tango.web.server.providers;
*** org.tango.web.server.resolvers, org.tango.web.server.interceptors.
Tango JAX-RS resources - Tango entities (aka device, attribute, commands etc) in mTangoREST.server.
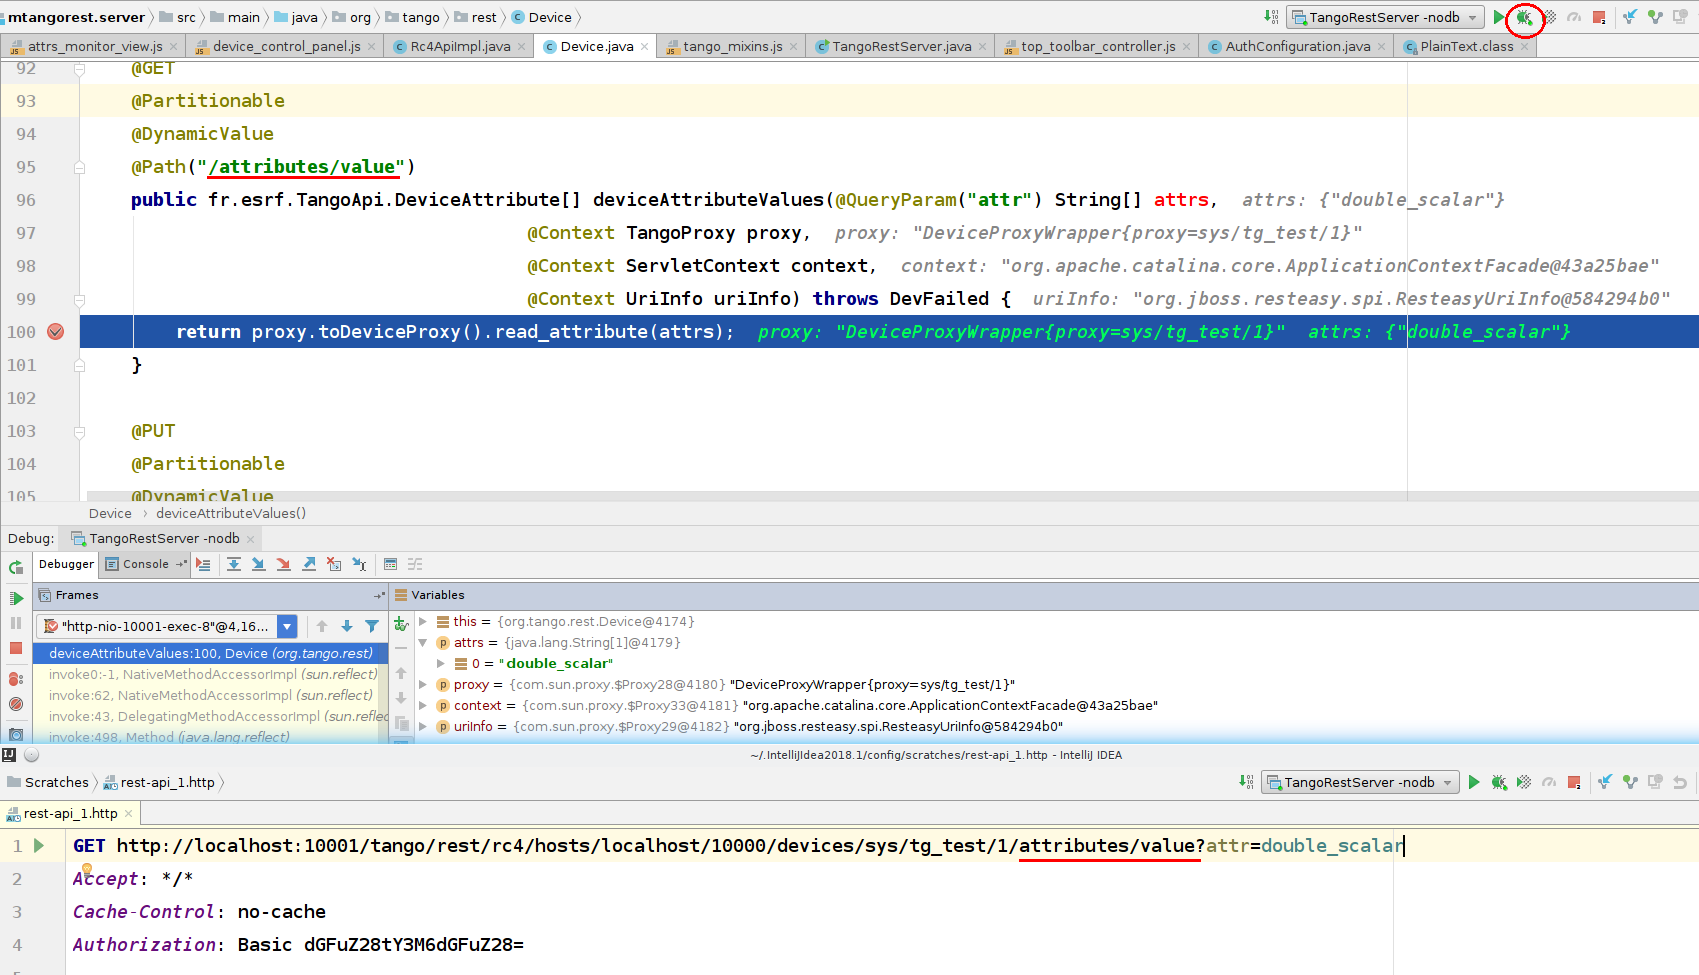
The examples of code structure and Device class are below:

If you debug Device.java class, you will see that URL maps onto the method via annotation in the class:
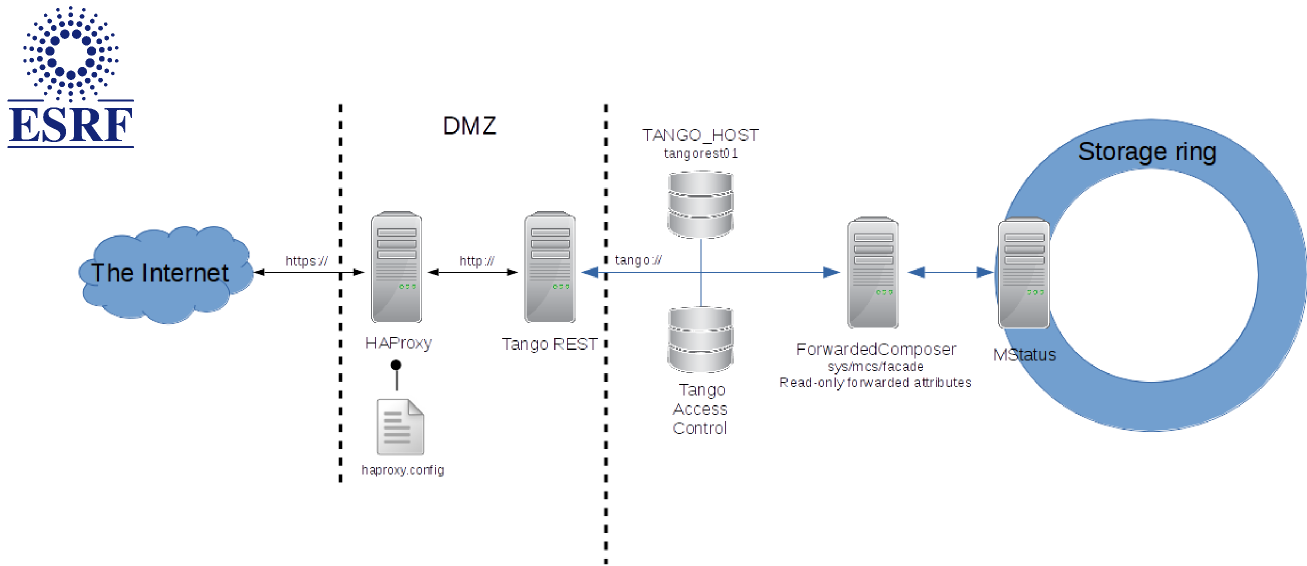
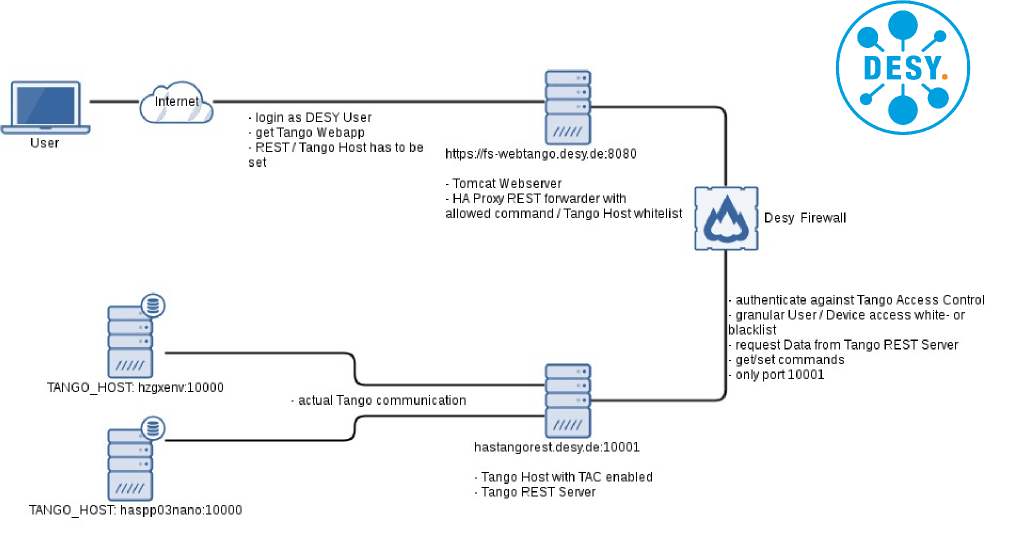
Deployment should be done by system administrators. Below you can see how it was done in ESRF and DESY.
Getting started as a developer
Make sure you have installed all the requirements. See Installation guide
You may want to skip this section and jump to WaltzPlatform reference guide
Developing custom dashboard for Waltz (ex. TangoWebapp)
In this section we will, first, develop a new widget (Dashboard) and integrate it into Waltz. Next, we will create a small custom application with this dashboard.
Adding a new widget
-
Create new .js file in resources/webix_widgets and name it my_dashboard.js
-
Copy'n'Paste the following code into the newly created file:
/**
 * @module MyDashboard
 */
(function(){
    //this function is private to this module
    var newPlotWidget=function(){
        return {
            gravity: 3,
            template: "template"
        }
    };

    /**
     * @type {webix.protoUI}
     */
    var my_dashboard = webix.protoUI(
        {
            name: 'my_dashboard',
            /**
             * @return {webix.ui}
             * @private
             */
            _ui:function(){
                return {
                    rows:[
                        {},
                        {
                            gravity: 3,
                            cols:[
                                {},
                                //call of the functuon. It is a good idea to move parts of the UI to a dedicated functions
                                newPlotWidget(),
                                {}
                            ]
                        },
                        {}
                    ]
                }
            },
            /**
             *
             * @param config
             * @constructor
             */
            $init:function(config){
                //extend client config with this widget's ui
                webix.extend(config, this._ui());
                //add some after construction logic
                this.$ready.push(function(){
                    webix.message("My dashboard has been initialized!")
                }.bind(this));//very important to bind function to a proper this object
            }
        }
    // webix.IdSpace is required to isolate ids within this component
    , webix.IdSpace, webix.ui.layout);//this component extends webix layout -- an empty view

    //this function will be available globally i.e. exports our dashboard
    newMyDashboard = function(config){
        return webix.extend({
            view: 'my_dashboard'
        }, config);
    }
})();
Here we have created a webix.protoUI my_dashboard -- a stub for a smart component of our new dashboard that extends webix layout. We also extends its functionality injecting webix.IdSpace mixin.
READ MORE:
[1] webix.protoUI
[2] webix.ui.layout
[3] webix mixins -- building blocks for existing and new components
[4] webix.IdSpace
- Next, we need to register our new dashboard among other platform widgets. For this open setup.js in resources/webix_widgets and add
'my_dashboard'to the array of webix files:
//file: resources/webix_widgets/setup.js

TangoWebappPlatform.ui = {
    _webix_files: [
        //...
        "attrs_monitor_view","device_monitor_view","scripting_console",
        "my_dashboard" //<!-- add this
    ]
};
This array is a list of widgets that are used in the application.
setup.js is required due to limitation of Nashorn (see upcoming presentation)
- Finally, lets add our dashboard to Waltz. Open main_controller.js in controllers/tango_webapp. And edit its buildUI function:
//file: controllers/tango_webapp/main_controller.js

    buildUI: function (platform_api) {
            //...

            ui_builder.set_right_item(TangoWebapp.ui.newDeviceControlPanel(platform_api.context));
            //add this to buildUI function -->
            ui_builder.add_mainview_item(
                {
                    header: "<span class='webix_icon fa-dashboard'></span> My Dashboard",
                    borderless: true,
                    body: newMyDashboard({id: 'my_dashboard'})
                });
            //<--
- Run Tomcat in IntelliJ IDEA (if not yet started and be sure REST is started) and check the result:

IMPORTANT: run Tomcat from IntelliJ IDEA, NOT from Terminal. Otherwise Tomcat won't update sources and may not deploy proper application at all.
adding plot to the new widget
- Replace newPlotWidget function from the previous part with the following:
    //file: resources/webix_widgets/my_dashboard.js

    //this function is private to this module
    var newPlotWidget=function(){
        return TangoWebapp.ui.newImageView({
            id:'mydashboard.plot',
            gravity: 3
        });
    };
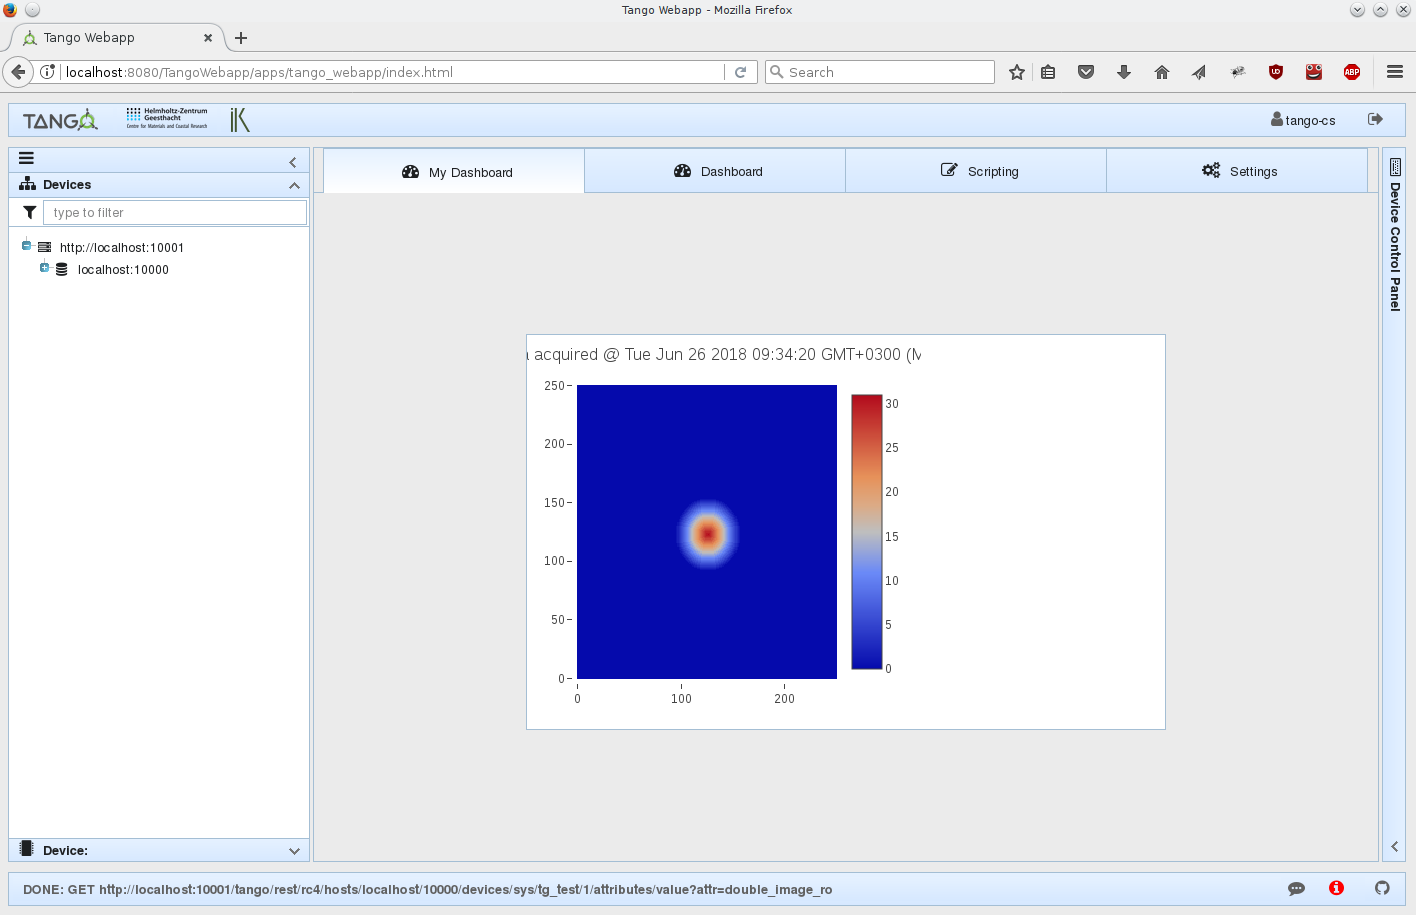
Here we use existing ImageView from Waltz platform. In the next step we will add data to it.
- Let's update our PlotWidget every second. Add this code to $ready.push(function(){...}) in my_dashboard.js.
NOTE Change localhost to what you have in Waltz if your Tango Host name differs.
NOTE Be sure your sys/tg_test/1 device is exported. If not, execute /usr/lib/tango/TangoTest test in Terminal where your Tango Controls locates.
    //file: resources/webix_widgets/my_dashboard.js#$init

    //store our plot widget reference for later use
    var plot = $$(this).$$('mydashboard.plot');
    //store attr promise for later use
    var attr = PlatformContext.rest.fetchHost('localhost:10000')
        .then(function(host){
            return host.fetchDevice('sys/tg_test/1');
        }).then(function (device) {
            return device.fetchAttr('double_image_ro')
        });
    //builtin JS function. It will execute attr.read every 1000 ms
    setInterval(function(){
        attr.then(function(attr){
                return attr.read();
            })
            .then(function(value){
                plot.update(value);
            })
            .fail(function(err){
                TangoWebappHelpers.error("Could not read attribute", err);
            });
    }.bind(this),1000);
Read more
[1] webix.promise
- Check the result. Switch to Firefox and refresh the page (
F5):
Further improvements
- Use Runnable mixin to perform the routine. Mixin - a block of code that lets us group declarations we may reuse.
Inject TangoWebappPlatform.mixin.Runnable into my_dashboard view:
    //file: resources/webix_widgets/my_dashboard.js#my_dashboard

    //code line # ~76
    , TangoWebappPlatform.mixin.Runnable, webix.IdSpace, webix.ui.layout);//<-- add TangoWebappPlatform.mixin.Runnable
- Insert run method before
$init:function(config){...}.
    //NEW CODE HERE!!!
    run:function(){
        var $$plot = $$(this).$$('mydashboard.plot');
        //note this.
        this.attr.then(function(attr){
                return attr.read();
            })
            .then(function(value){
                $$plot.update(value)
            })
            .fail(function(err){
                TangoWebappHelpers.error("Could not read attribute", err);
            })
    },
    /**
     *
     * @param config
     * @constructor
     */
    $init:function(config){
And we change the body of the this.$ready.push function.
Replace the this.$ready.push with following:
        this.$ready.push(function(){
            //NOW STORE attr AS PROPERTY
            this.attr = PlatformContext.rest.fetchHost('localhost:10000')
                .then(function(host){
                    return host.fetchDevice('sys/tg_test/1');
                }).then(function (device) {
                    return device.fetchAttr('double_image_ro')
                });
            //start the routine
            this.start();//this function is defined in Runnable mixin
        }.bind(this));//very important to bind function to a proper this object
NOTE here we delete setInterval in $ready function and add run method:
Usage of TangoWebappPlatform.mixin.Runnable will handle a number of situations for you. Like suspending the routine when the widget is not visible. To check this lets use Firefox dev tools:
- Switch to Firefox and refresh the page (
F5). Now open dev tools (F12) and switch to the Network tab:

You will notice a bunch of requests every second. If you switch to Settings tab requests will cease to appear. This is because TangoWebappPlatform.mixin.Runnable implements this functionality.
And of course it is a good practice to extract common functionality and re-use it. You can define your own mixins!!!
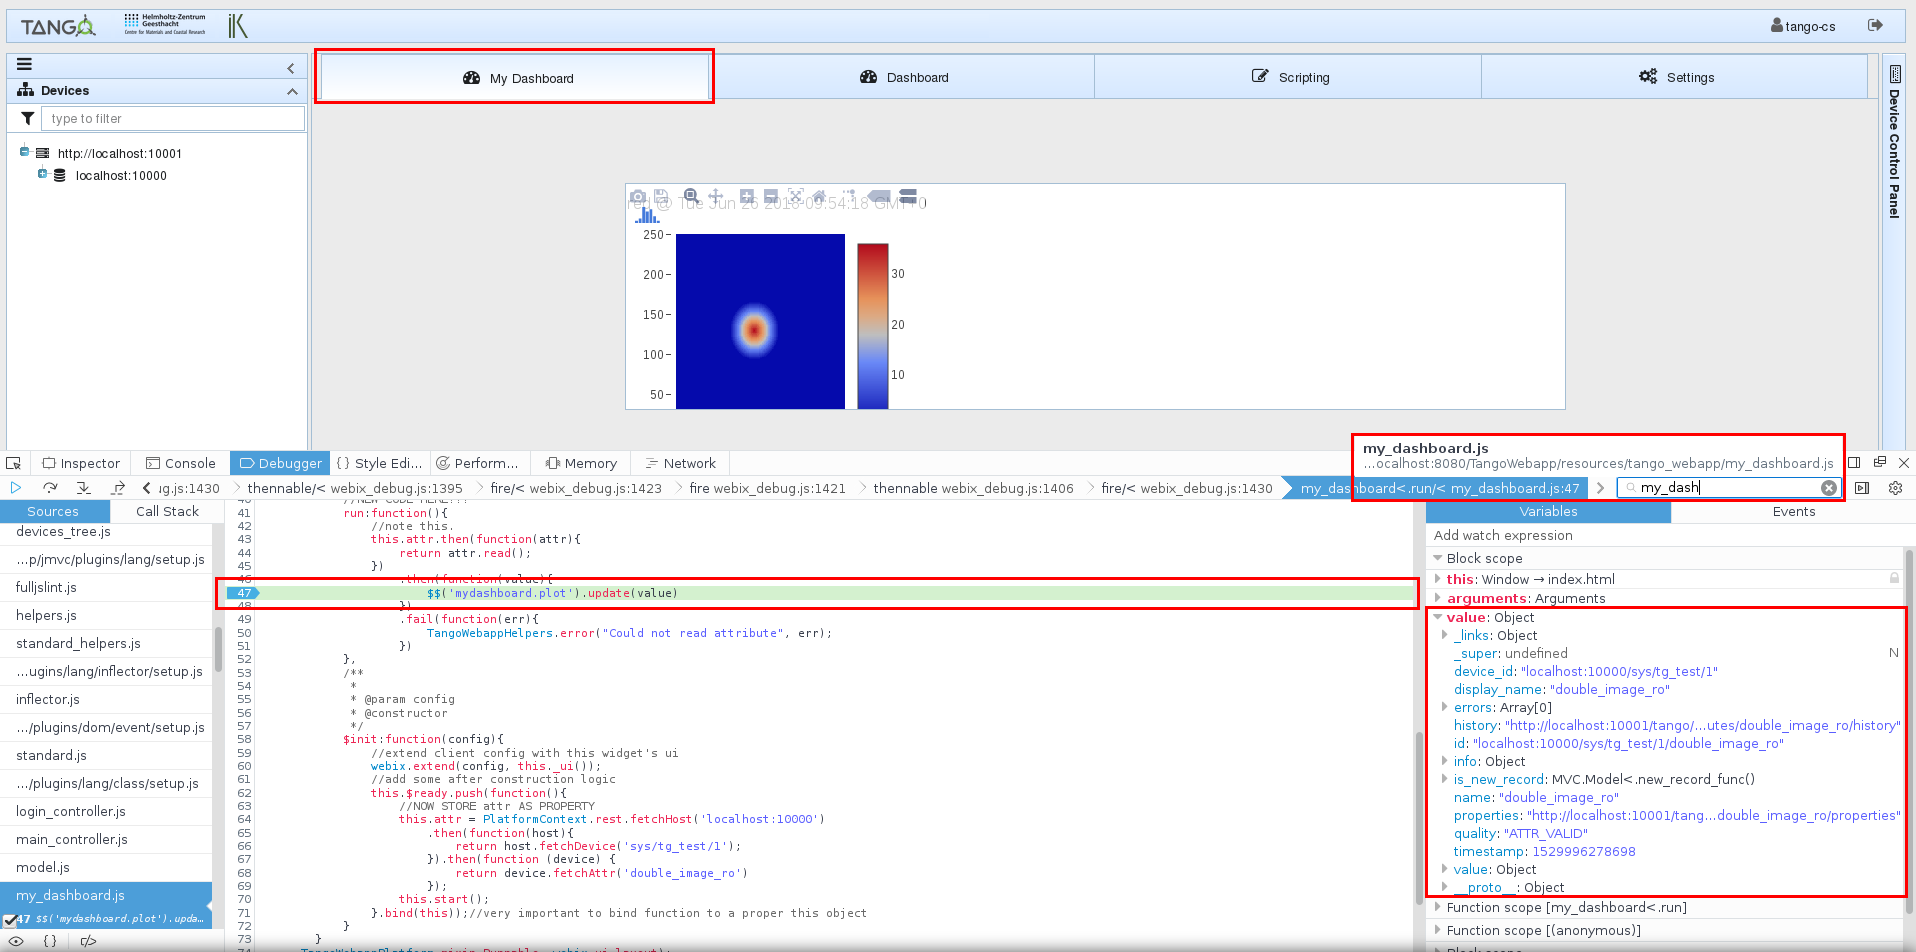
- Using dev tools debugger. Very important feature and skill - to debug the code. Lets have a look what we get from the server when reading our attribute. Switch to Debugger tab look for my_dashboard.js, put a break point and switch back to My Dashboard tab in Waltz:
Add functional test
- First generate a new test stub in your project root:
$>  ./jmvcc jmvc/generate/test functional test_my_dashboard
Generating ... test/functional/test_my_dashboard_test.js

              Done!


              Make sure to add to your application files!

$>
This command will add a new file in test/functional folder. Alter its content as follows:
new Test.Functional('test_my_dashboard',{
   test_truth: function() {
       var dashboard = newMyDashboard({id:'my_dashboard_test'});
       webix.ui({
           view: 'window',
           close: true,
           width: 800,
           height:600,
           body: dashboard
       }).show();

       this.assert(true);
   }
});
In this test we will simply open a new webix window with our dashboard.
Now we need to enable this test and run the application in test mode:
Read more
[1] webix.window
- Add
'test_my_dashboard'line into apps/tango_webapp/test.js
//file: apps/tango_webapp/test.js

include.functional_tests(
    //...
    'tango_webapp/attrs_monitor_view',
    'test_my_dashboard' //<!--
);
- Enable test mode in apps/tango_webapp/index.html:
<!-- file: apps/tango_webapp/index.html-->

<!--<script type="text/javascript" src="../../jmvc/include.js?tango_webapp,development"></script>-->
<script type="text/javascript" src="../../jmvc/include.js?tango_webapp,test"></script> <!-- replace development with test -->
- Switch to Firefox and refresh the page (
F5). A test console will popup. Wait until all tests are loaded, switch to Functional tab, scroll to my_dashboard test and run it:

The final version of the code for this exercise is available here
Developing custom application using Waltz (ex. TangoWebapp) platform
- Create new jmvc app in the project root:
$> ./jmvcc jmvc/generate/app my_app
               apps/my_app
Generating ... apps/my_app/compress.js
               apps/my_app/index.html
               apps/my_app/run_unit.js
               apps/my_app/test.js
               apps/my_app.js
               controllers/my_app/main_controller.js

Make sure to add new files to your application and test file!
$>
- Set up dependencies. Add
include('platform')and webix widgets to apps/my_app.js :
//file: apps/my_app.js

include('platform')

//...
include(function(){
    //...
    //webix widgets
    include.resources(
        "webix_widgets/setup"
    );
});
- Enable plotly library as it is required for plots. Uncomment plotly in index.html:
<!--file: apps/my_app/index.html -->

<!--<script type="text/javascript" src="https://cdn.plot.ly/plotly-latest.js"></script>-->
<!-- uncomment plotly -->
<script type="text/javascript" src="https://cdn.plot.ly/plotly-latest.js"></script>
- Replace main_controller.js#load function with buildUI in controllers/my_app/main_controller.js:
//file: controllers/my_app/main_controller.js

//replace load function
buildUI: function(platform){
    var ui_builder = platform.ui_builder;

    ui_builder.add_mainview_item({
        header: "<span class='webix_icon fa-dashboard'></span> My Dashboard",
        borderless: true,
        body: newMyDashboard({id: 'my_dashboard'})
    });
}
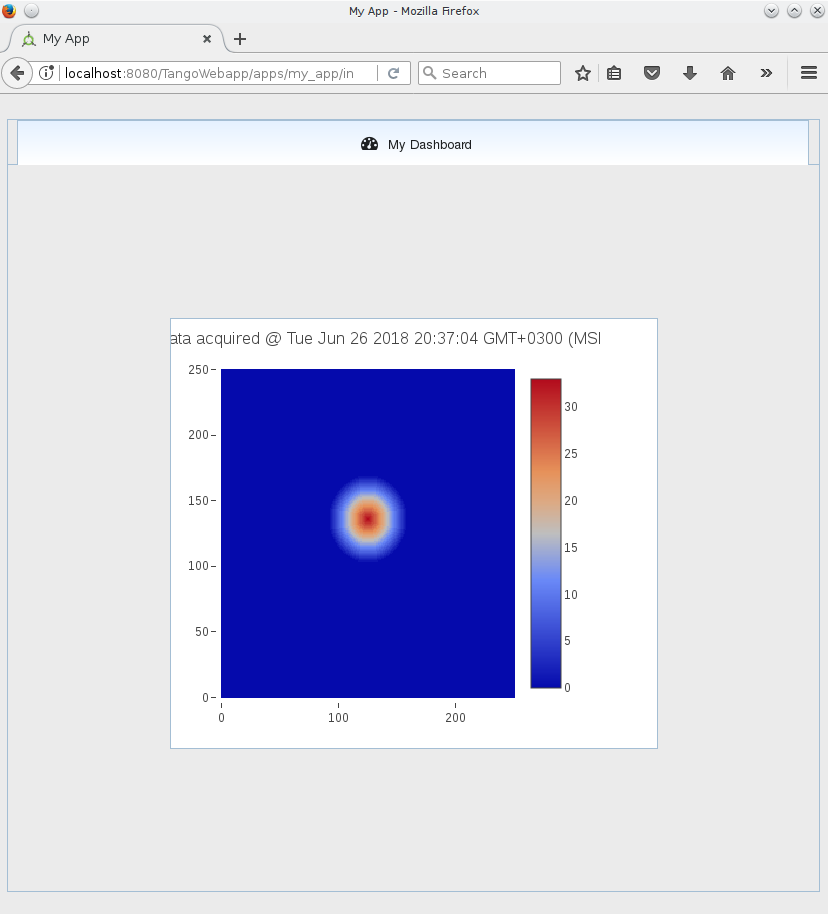
- Check the result. Switch to Firefox and navigate to
http://localhost:8080/WaltzDev/apps/my_app/index.html
NOTE my_app in the link
Packaging application
Packaging. Create assemble script in the project root folder:
var buildDir = "build/work";
$EXEC("ant -f jmvc/ant/build.xml build -Dapp=platform -DbuildDir=${buildDir}")
echo($OUT)
echo($ERR)
if($EXIT !== 0) exit($EXIT)

$EXEC("ant -f jmvc/ant/build.xml build -Dapp=my_app -DbuildDir=${buildDir}")
echo($OUT)
echo($ERR)
if($EXIT !== 0) exit($EXIT)

$EXEC("ant -f jmvc/ant/build.xml compress-and-move -Dapp=my_app -DbuildDir=${buildDir}")
echo($OUT)
echo($ERR)
if($EXIT !== 0) exit($EXIT)

$EXEC("ant -f jmvc/ant/build.xml copy-webapp -DbuildDir=${buildDir}")
echo($OUT)
echo($ERR)
if($EXIT !== 0) exit($EXIT)

$EXEC("ant -f jmvc/ant/build.xml war -DbuildDir=${buildDir}")
echo($OUT)
echo($ERR)
if($EXIT !== 0) exit($EXIT)
And run it: $> ./jmvcc assemble
The following output indicates successful execution:
...
war:
      [zip] Building zip: /storage/Projects/hzg.wpn/mTangoSDK/tango-webapp/build/distributions/TangoWebapp.war

BUILD SUCCESSFUL
Total time: 0 seconds
$>
build/distributions/TangoWebapp.war file can now be deployed to tomcat. But it is a good idea to automatize this process. See next section.
Continuous integration
- Move assemble script to jmvc/ folder. Now Travis will automatically build my_app every time new code is pushed to GitHub.
Applying custom styles
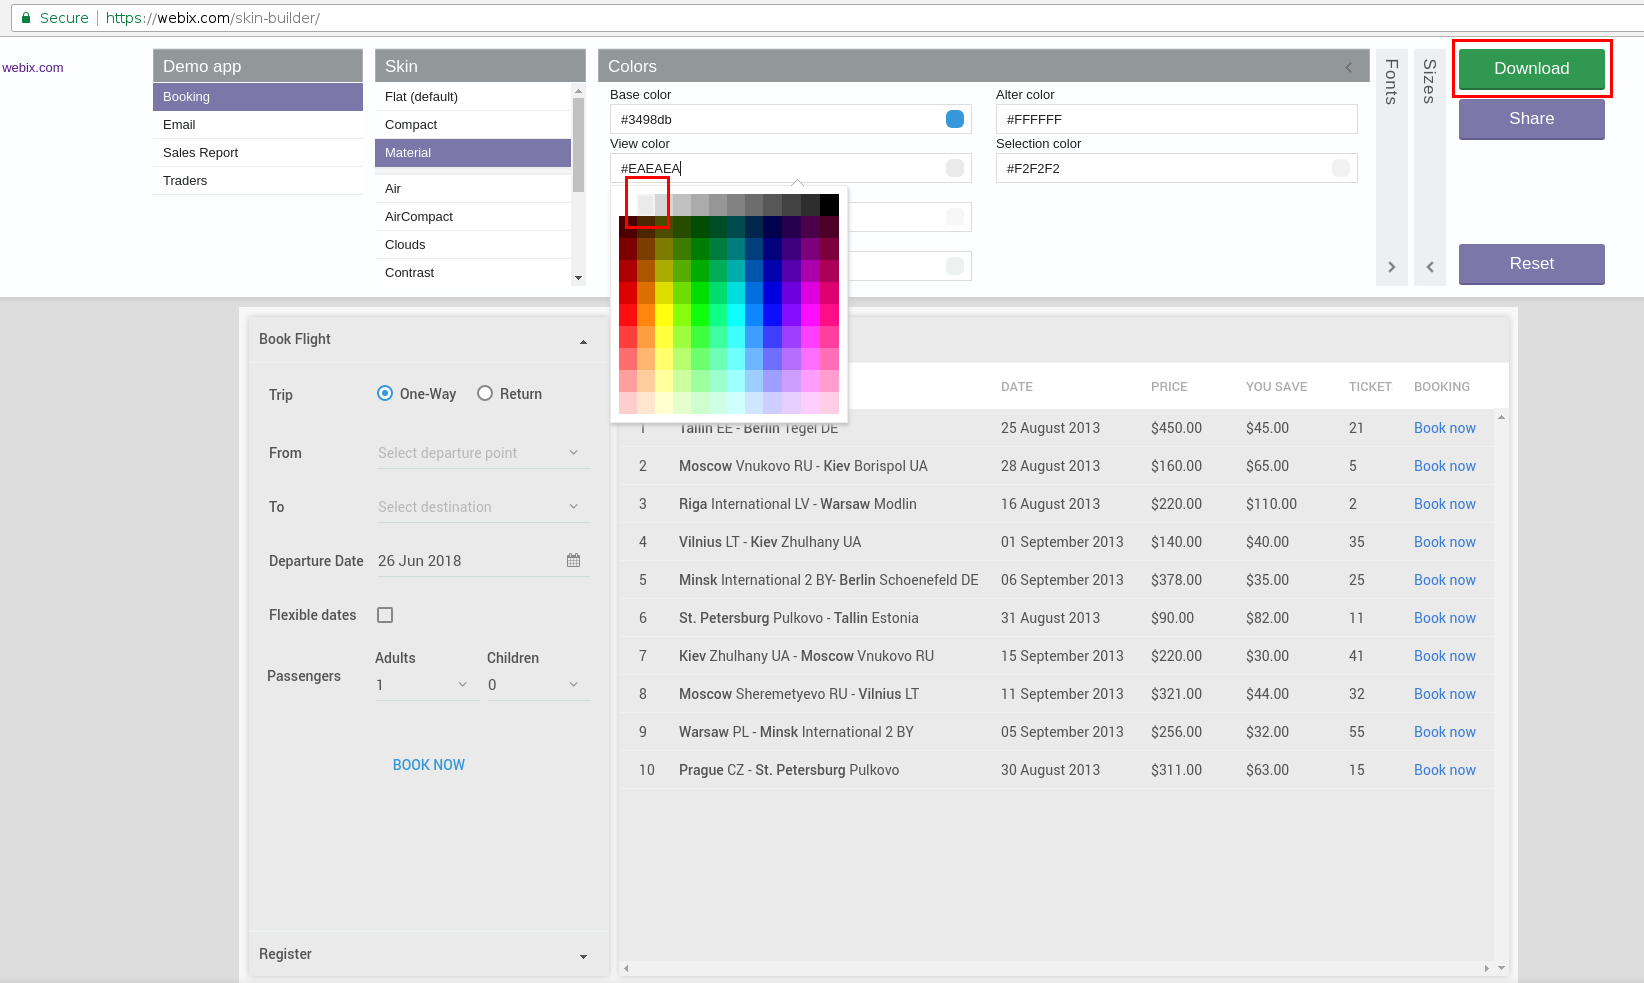
- Go to the webix skin builder link:
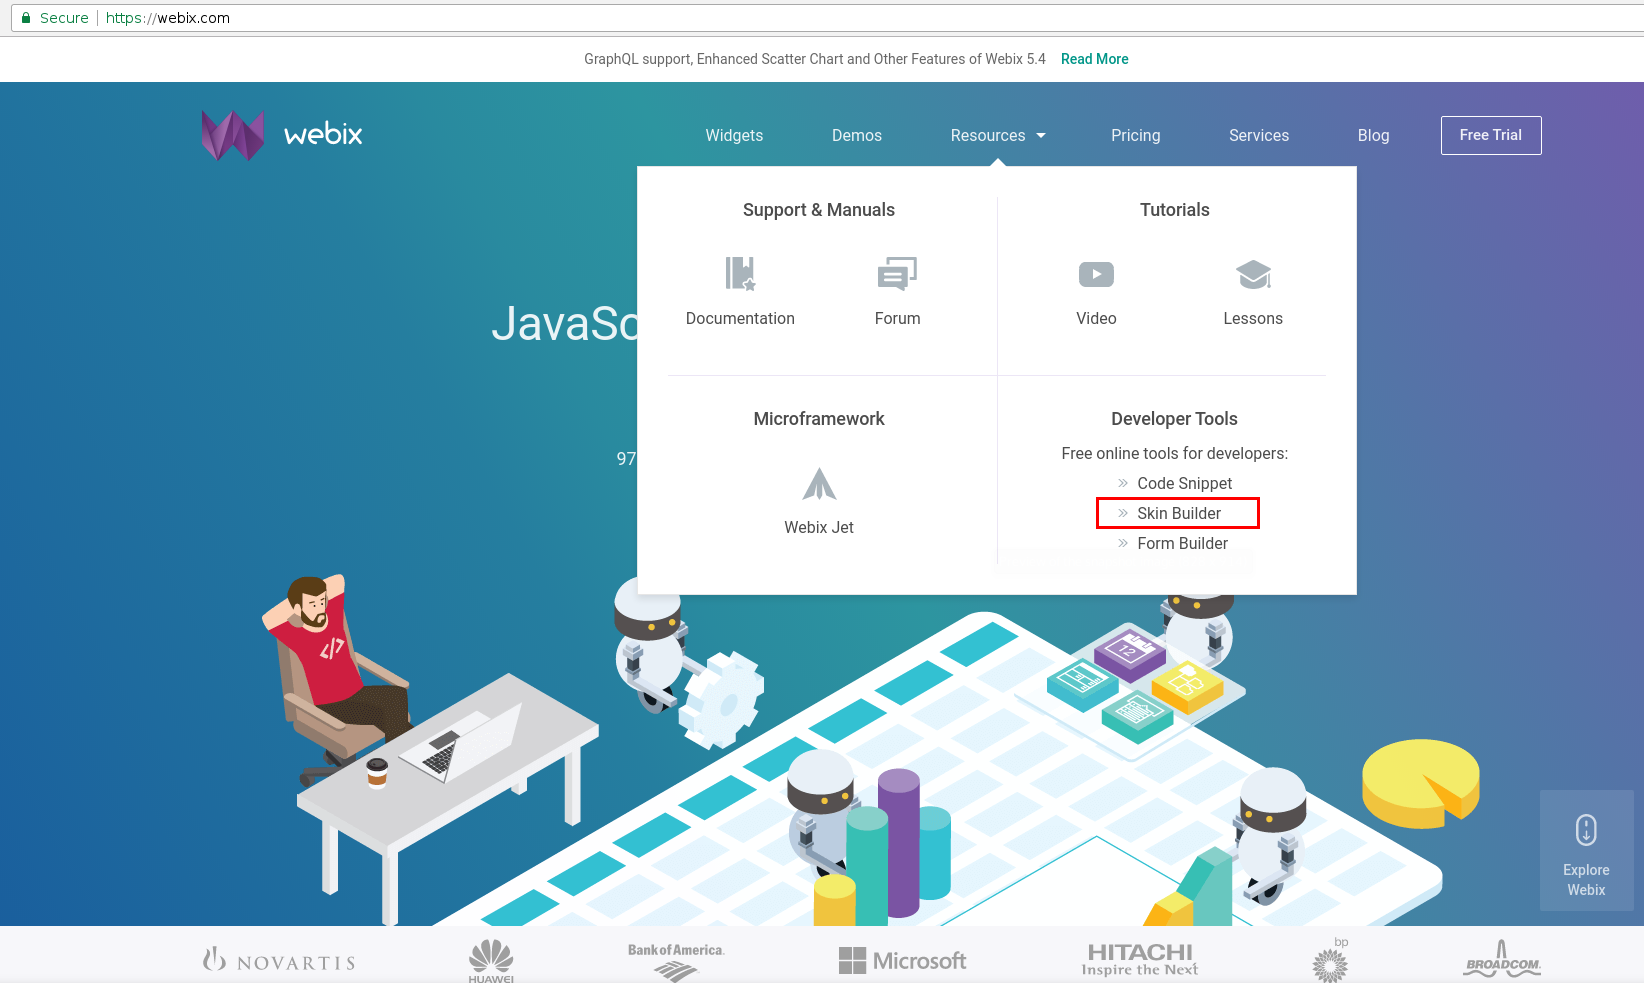
- Play with different style themes. We will choose material and adjust background color/view color and download the resulting theme:
- Unpack downloaded archive into stylesheets folder and enable the new skin in index.html (apps/my_app folder) adding:
<!-- file: apps/my_app/index.html -->

<!--<link rel="stylesheet" href="https://cdn.webix.com/5.2/skins/aircompact.css" type="text/css">-->
<link rel="stylesheet" href="https://cdnjs.cloudflare.com/ajax/libs/font-awesome/4.7.0/css/font-awesome.min.css">
<link rel="stylesheet" href="../../stylesheets/webix.css" type="text/css">

<!-- ... -->
<script type="text/javascript" src="https://cdn.webix.com/5.2/webix_debug.js"></script>
<script type="text/javascript" src="../../stylesheets/skin.js"></script><!-- add this -->
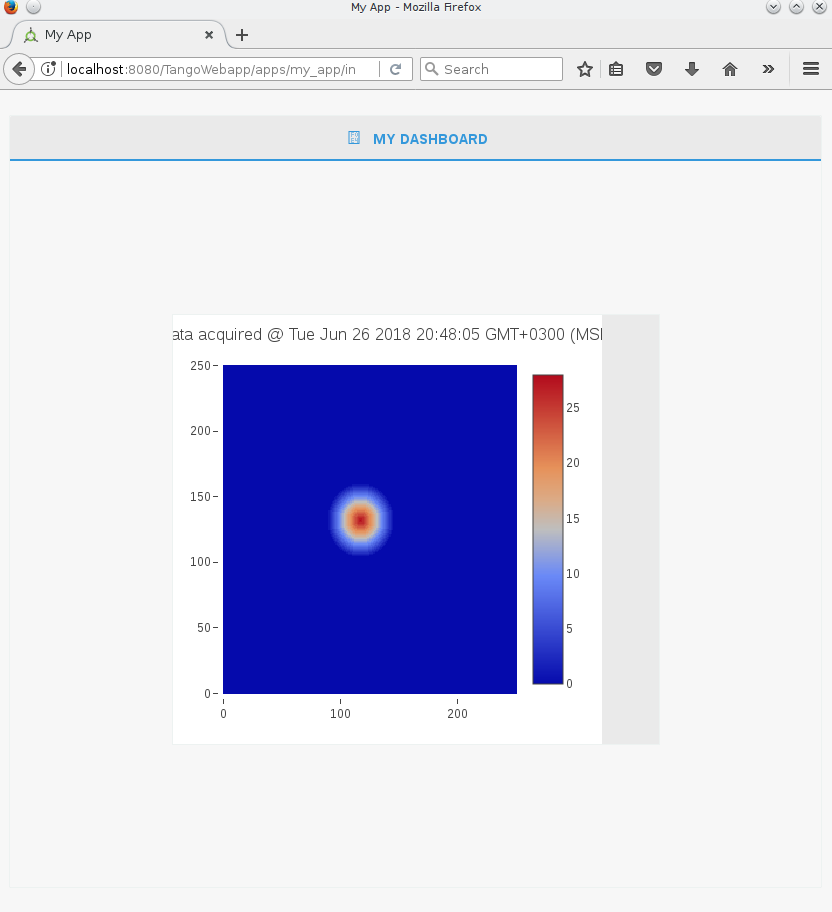
- Check the result:
Read more
[1] webix skins
Final code for this exercise can be found here
Advanced exercise
Data binding
Automatically switch data source for our widget when user clicks on an image attribute in the Device tree view
Responsive design
Test application for design responsiveness using dev tools
WaltzPlatform reference guide
WaltzPlatform is a framework for building Tango web applications. Waltz application is such application.
WaltzPlatform from the developer point-of-view is a bunch of jmvc applications, backend and widgets.
Project structure is defined by javascriptmvc-1.5.x (jmvc) framework.
Each jmvc application has the following:
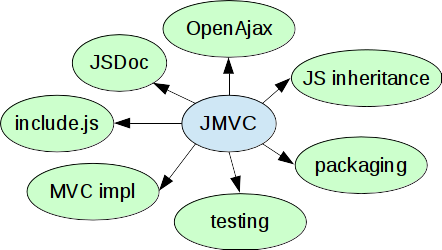
- include.js
- JS inheritance emulation
- documentation auto generation
- test console where you can run Unit tests. You can test widget(s) separately.
- packaging
- OpenAjax for loose coupling
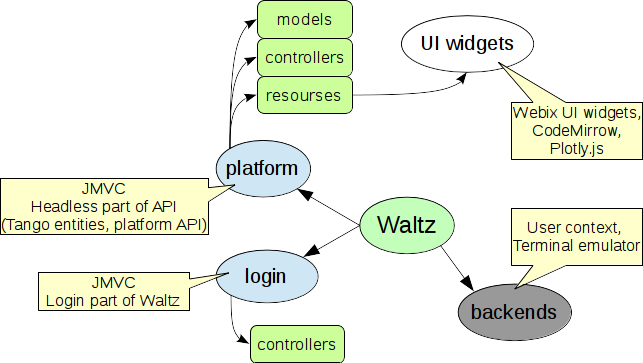
WaltzPlatform module diagram:
High level architecture overview
Waltz implements classical 3-tiers architecture:
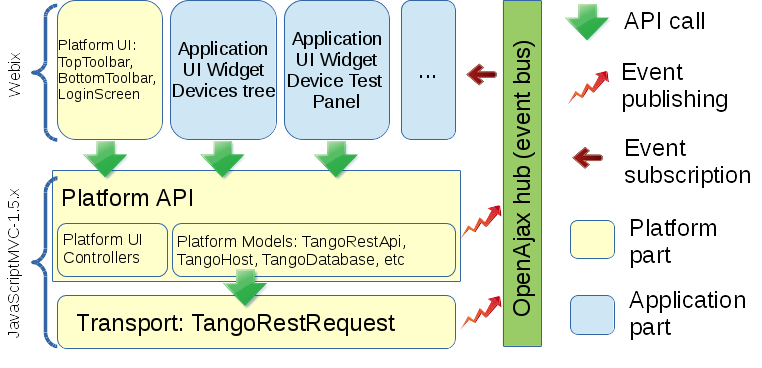
Where data access layer is Transport. Functional layer is PlatformAPI i.e. UI-less part of the WaltzPlatform. Finally UI layer is webix_widgets i.e. smart components included into WaltzPlatform that can be used as building blocks for custom applications/widgets built on top of WaltzPlatform.
WaltzPlatform API
Important part of the WaltzPlatform is its API. Waltz Platform API has the following parts:
UIBuilder
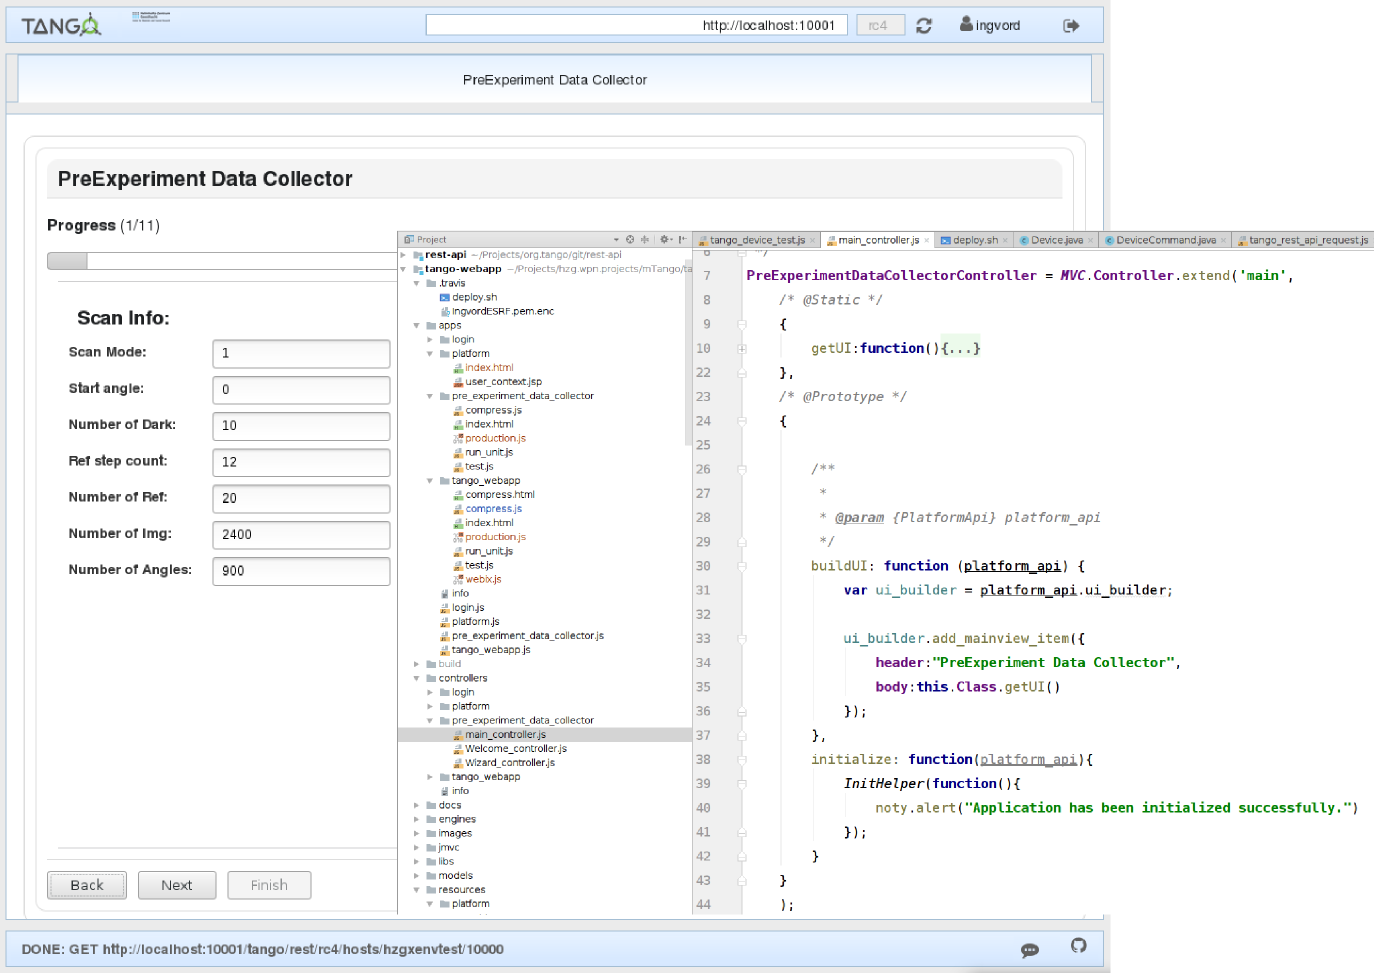
UIBuilder provides API to build UI of the application based on WaltzPlatform. Below is an example of using UIBuilder to build Waltz application UI:

UIBuilder supports customization of all 5 panels, as well as not using some of the panels. Below is an example of an application that uses only main view panel:
Full UIBuilder API reference: link
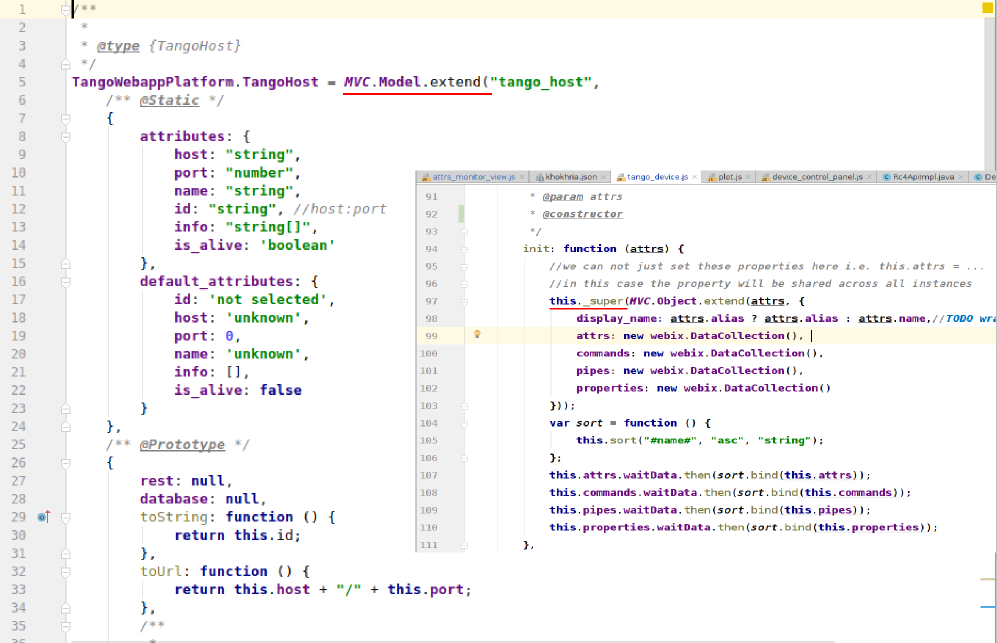
Tango device model
WaltzPlatform provides high level API of the Tango devices model e.g. TangoDevice.
Full API reference of the Tango device model can be found here: link
Tango REST API js adapter
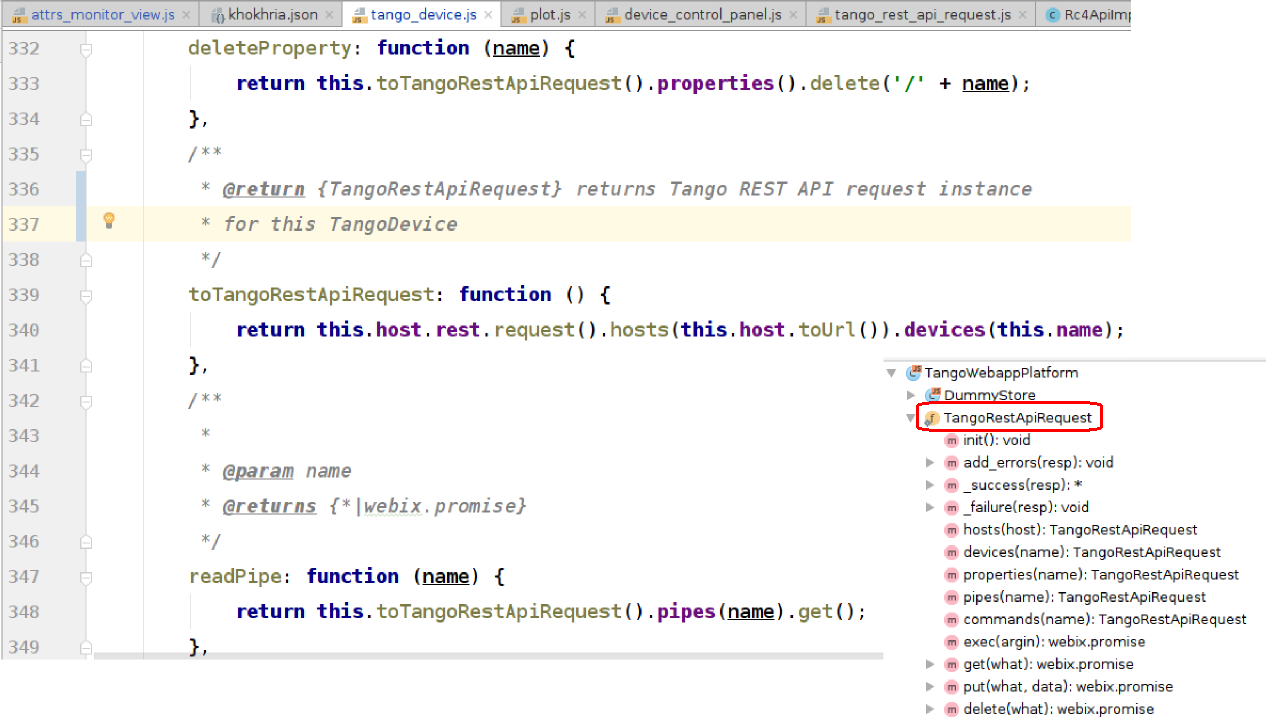
WaltzPlatform provides API to Tango REST. TangoRest API implements builder pattern:
Utility models and helpers
PlatformContext
Context of the application.
Full API reference: link
UserContext
Developer may store custom data per user basis using UserContext API. UserContext has ext field that can store any data. UserContext may be backed by a dedicated backend to persist the data (for instance, UserContextBackend). By default all the data is stored in-memory DB provided by WaltzPlatform.
To specify UserContext backend provide env argument to assemble command:
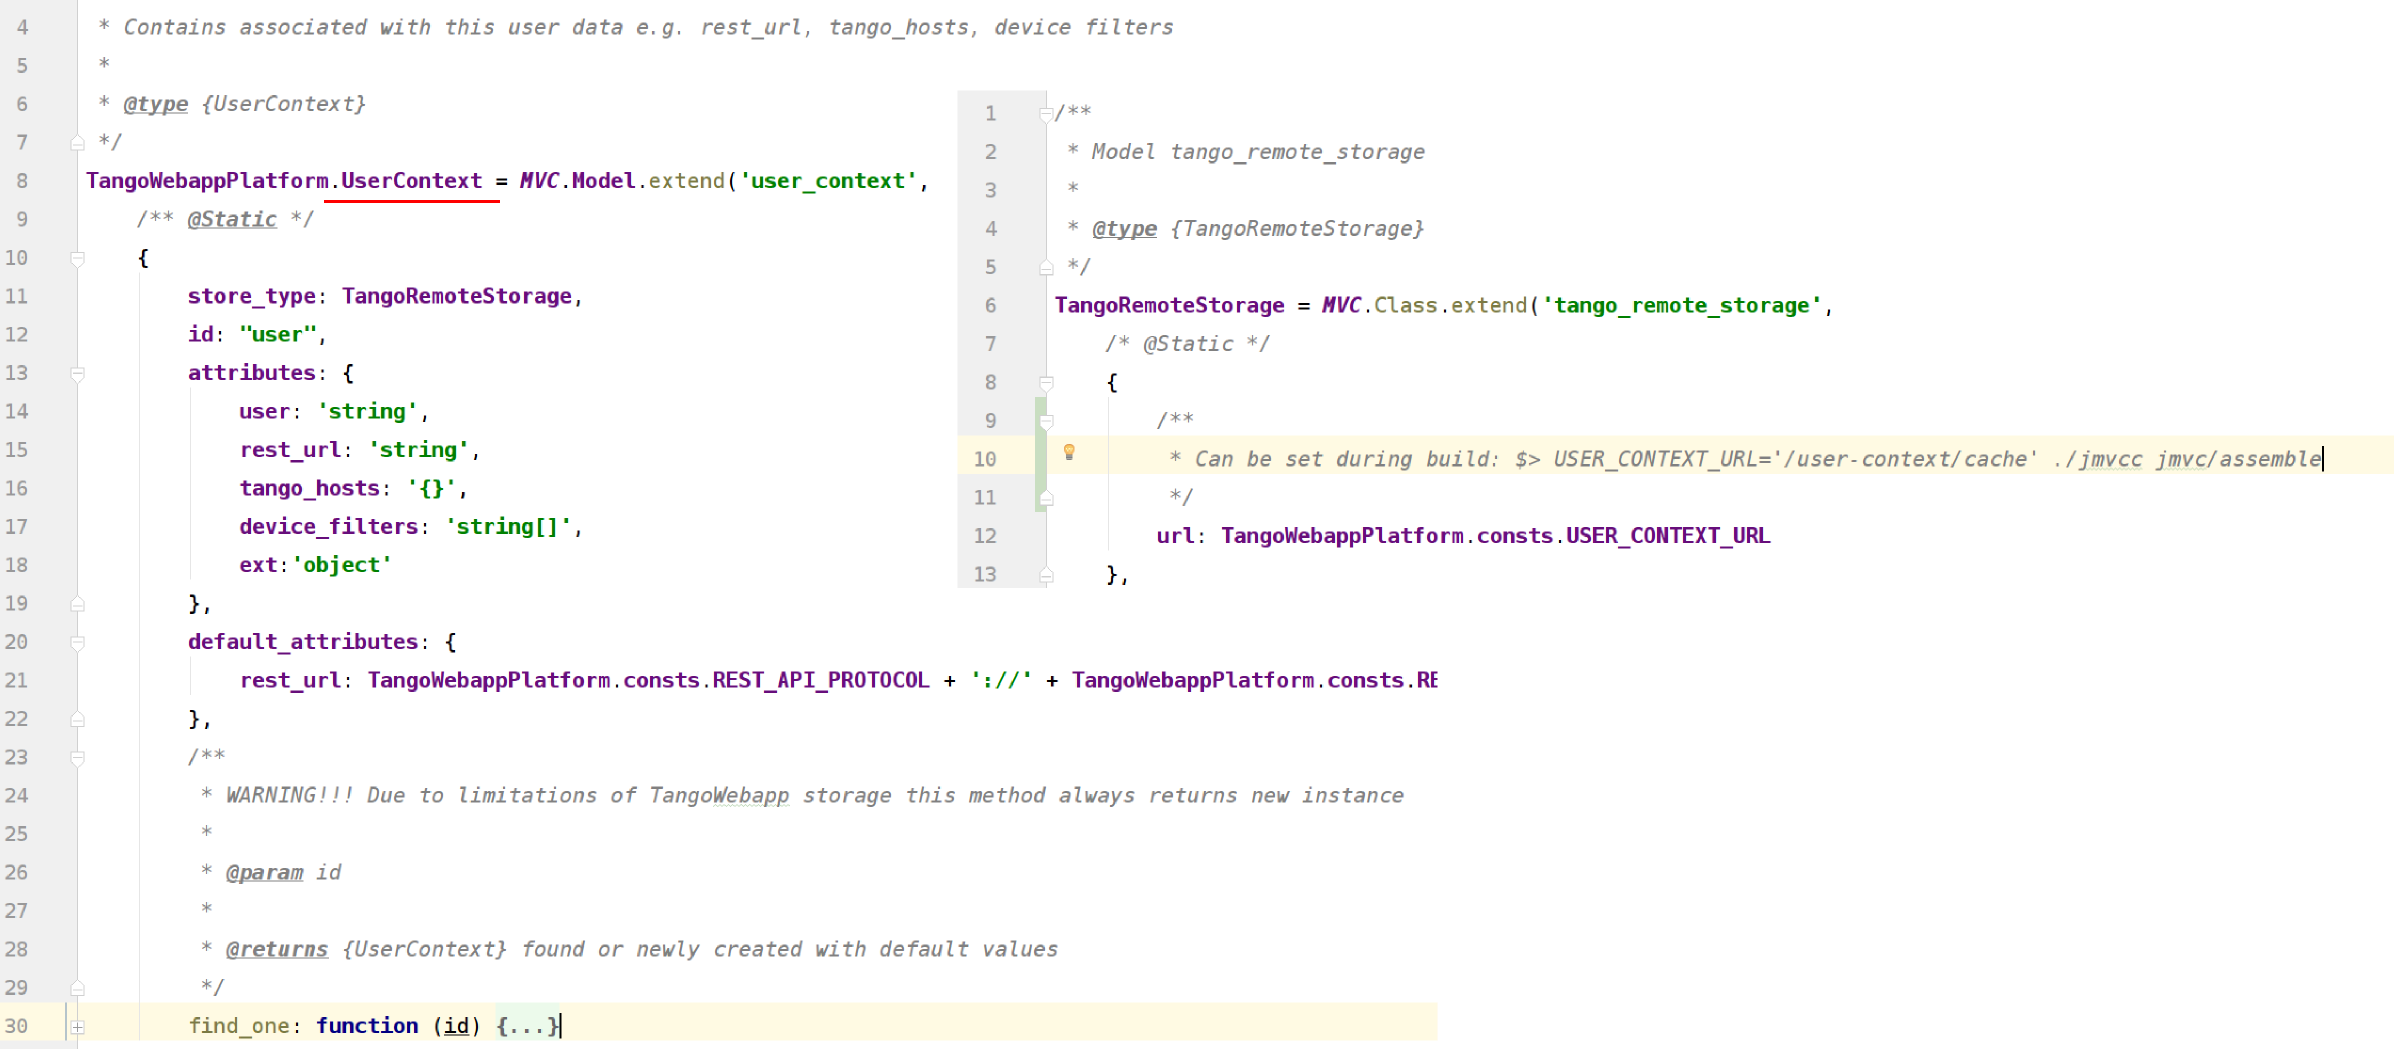
Full UserContext API reference: link
include.js
include.js is a part of jmvc. include.js is used to define dependencies of the application:
JS inheritance
WaltzPlatform provides a number of models that can be extended using jmvc inheritance feature:
webix widgets
WaltzPlatform uses webix for UI components and data binding.
Data binding allows dynamic update of the components bound to each other:
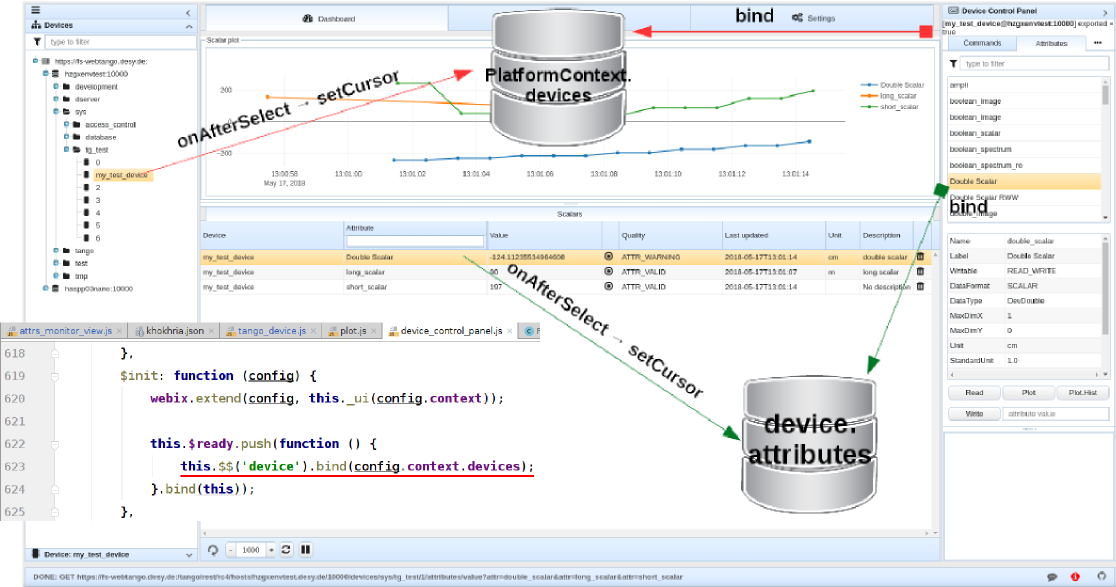
All WaltzPlatform widgets are implemented as webix.protoUIs:
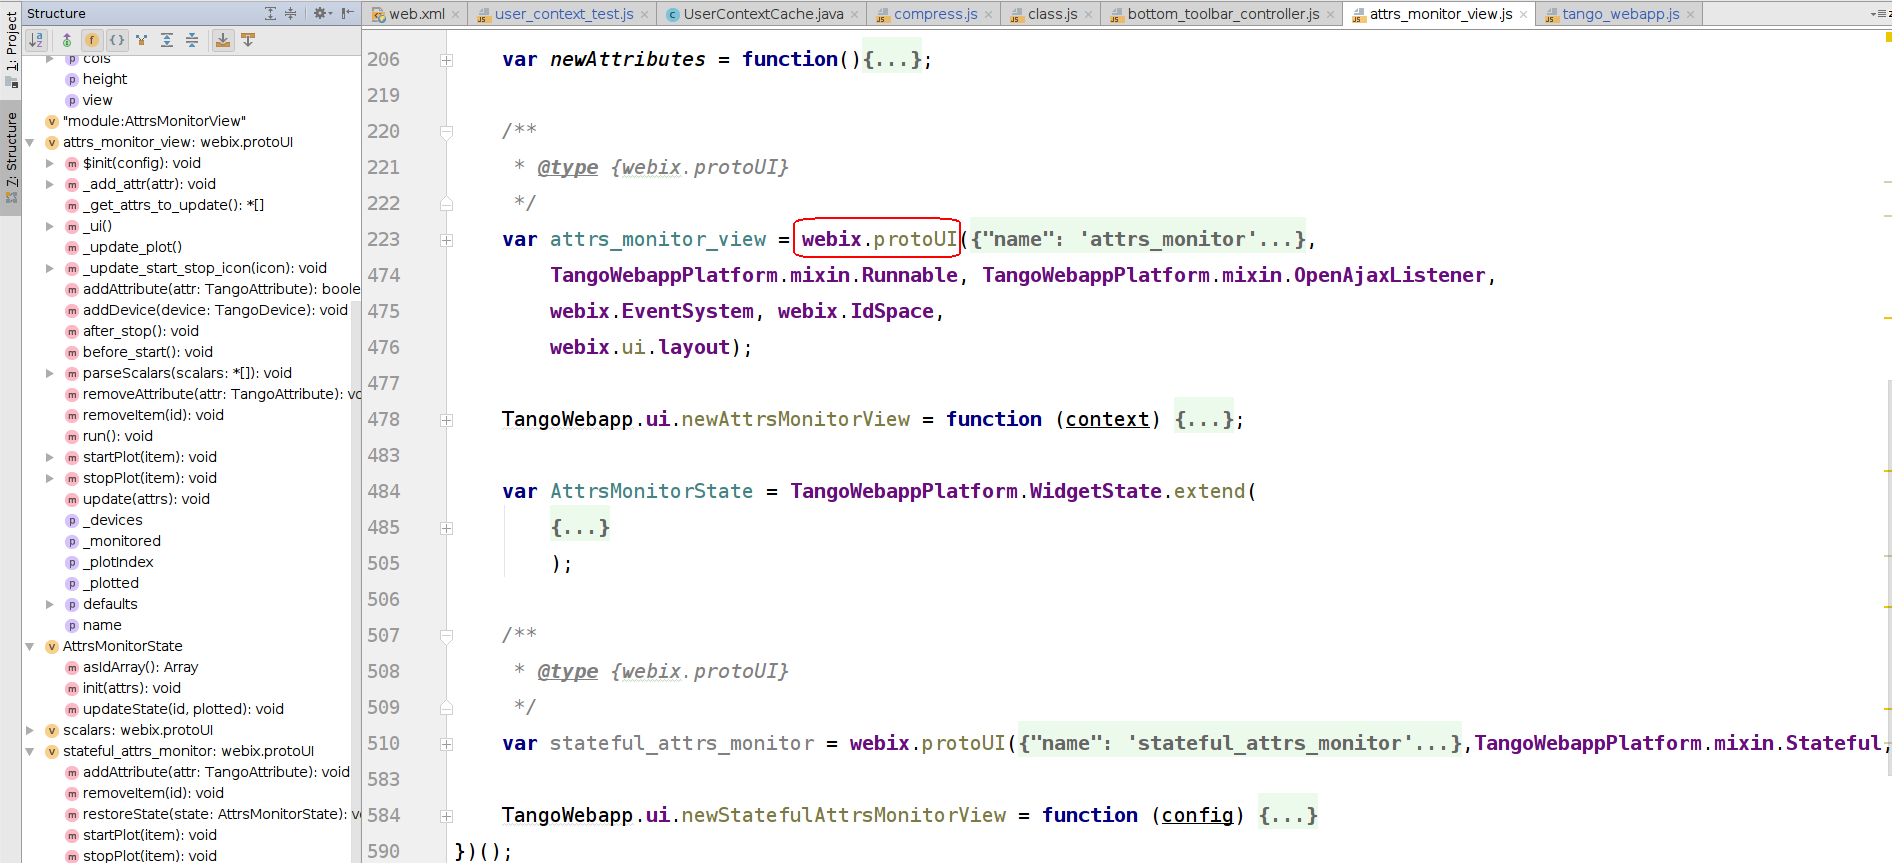
Please read webix documentation to become familiar with protoUI.
Full webix widgets API reference: link
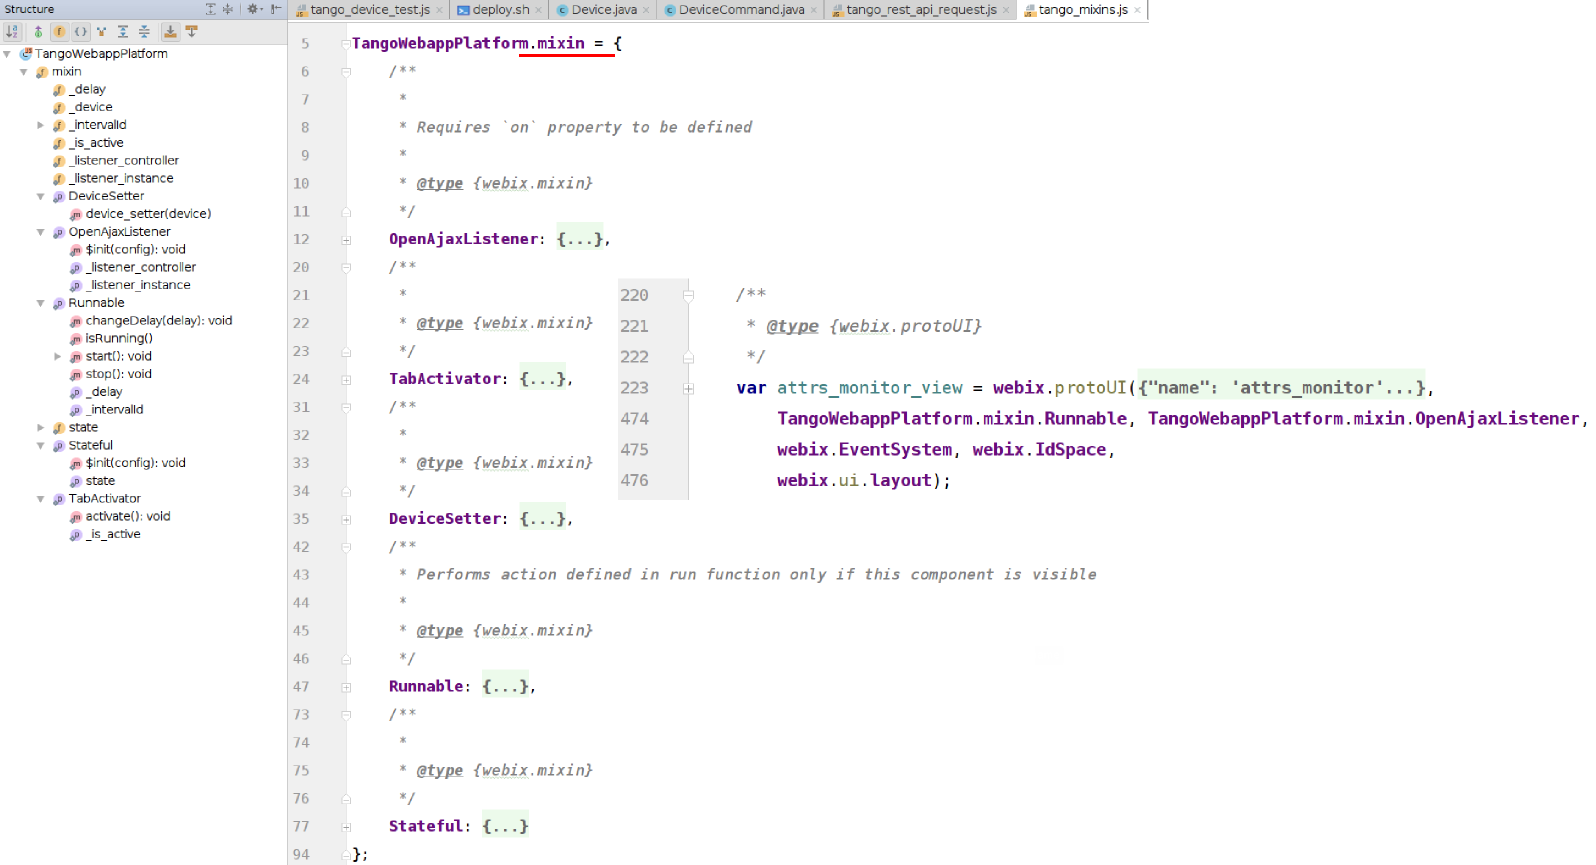
webix mixins
Mixin is another way (comparing to inheritance) to extrend JS object's functionality. WaltzPlatform provides a number of mixins that can be used to extend custom widgets:
OpenAjax events
WaltzPlatform uses OpenAjax event bus to loose coupling between components and to allow customizations.
jmvc provides convenient way to declare subscription to an OpenAjax event:
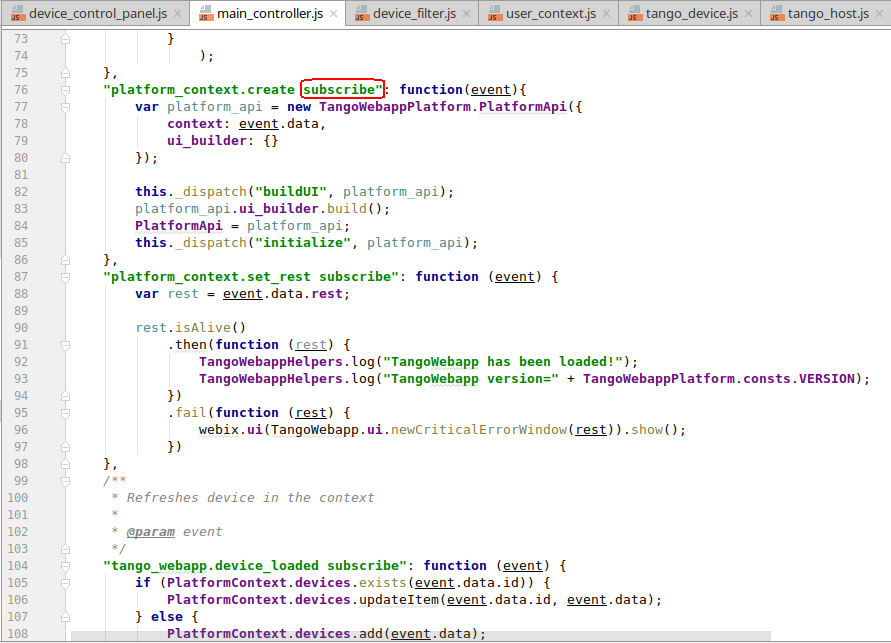
The following events are supported by WaltzPlatform:
platform_context.create
Fires when PlatformContext is being created
platform_context.destroy
Fires when PlatformContext is being destroyed i.e. user logs off.
platform_context.set_rest
Fires when TangoRest instance is being injected into PlatformContext
platform_context.set_user_context
Fires when UserContext instance is being injected into PlatformContext
tango_webapp.tango_host_loaded
Fires when new TangoHost has been loaded
tango_webapp.rest_send
Fires when new Tango REST request is being sent
tango_webapp.rest_failure
Fires when new Tango REST request has failed
tango_webapp.rest_success
Fires when new Tango REST request has succeed
tango_webapp.device_loaded
Fires when new TangoDevice has been loaded
tango_webapp.device_open
Fires when user clicks on open in DevicesTree context menu
tango_webapp.device_configure
Fires when user clicks on configure in DevicesTree context menu
tango_webapp.device_delete
Fires when user clicks on delete in DevicesTree context menu
tango_webapp.device_view
Fires when user clicks on delete in DevicesTree context menu
tango_webapp.device_view.update_attr_config
Fires when user updates device's configuration
tango_webapp.attr_
tango_webapp.attr_add_to_monitor
Fires when user adds a new attribute to Dashboard
tango_webapp.item_selected
tango_webapp.database_loaded
user_action.log
Fires when user action is being logged
platform_api.ui.initialized
Fires when UI has been built
platform.user_logout
Fires when user logs out
user_context.create.as_existing
Fires when new UserContext instance is being created
user_context.destroy
Fires when new UserContext instance is being destroyed
user_context_controller.found
Fires when UserContext instance for given user has been found
user_context_controller.update
Fires when UserContext instance is being updated
user_context_controller.destroy
Fires when UserContext instance is being destroyed
user_context_controller.add_tango_host
Fires when new TangoHost instance is being injected into UserContext instance
user_context_controller.delete_tango_host
Fires when new TangoHost instance is being deleted from UserContext instance
tango_rest_api.is_alive
Fires when new Tango REST server responds
tango_rest_api.is_not_alive
Fires when new Tango REST server does not respond
Unit and functional testing
Developer should write unit and functional tests to achieve better user experience with the application. WaltzPlatform applications can be switched to test mode:
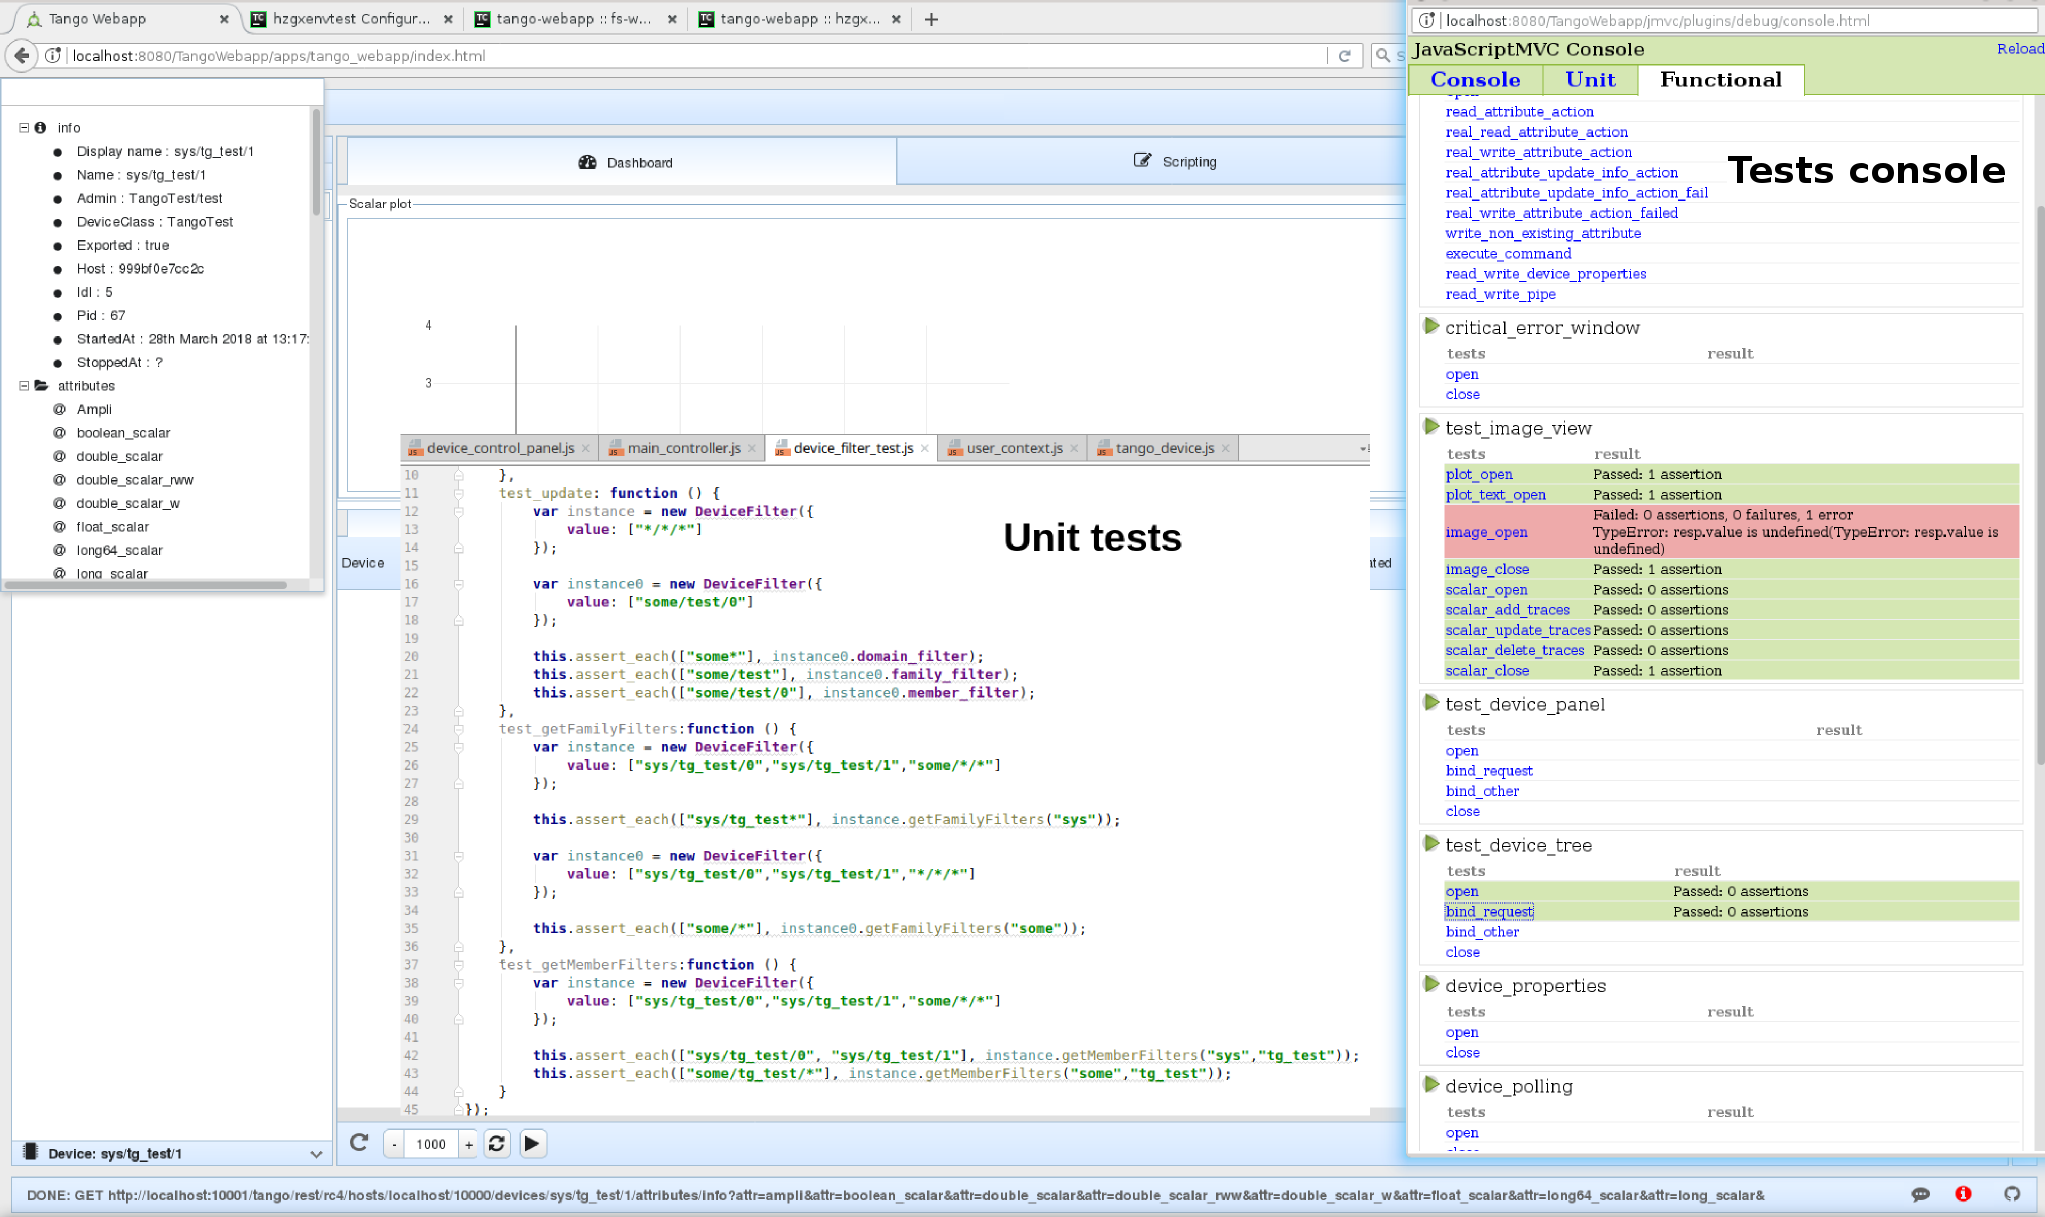
In this mode test console will appear (if not - make sure the popups are not blocked in your browser). Use this console to run unit/functional tests.
Refer to add functional test for more info on how to setup test mode.
To add unit test follow the procedure but use unit key word instead of functional e.g. ./jmvcc jmvc/generate/test unit my_unit_test
Packaging and deployment
Using jmvc console utility program developer can package WaltzPlatform based applications into production ready .war files: ./jmvcc jmvc/assemble

When application is beaing packaged all the .js files are assembled into a single assembly.js file and then "compiled" by Google Closure compiler into production.js. In addition all resources (images, css etc) are packed into a single .war file. This .war file may be deployed into production.
Below is an example of a deploy script that is run by Travis CI:
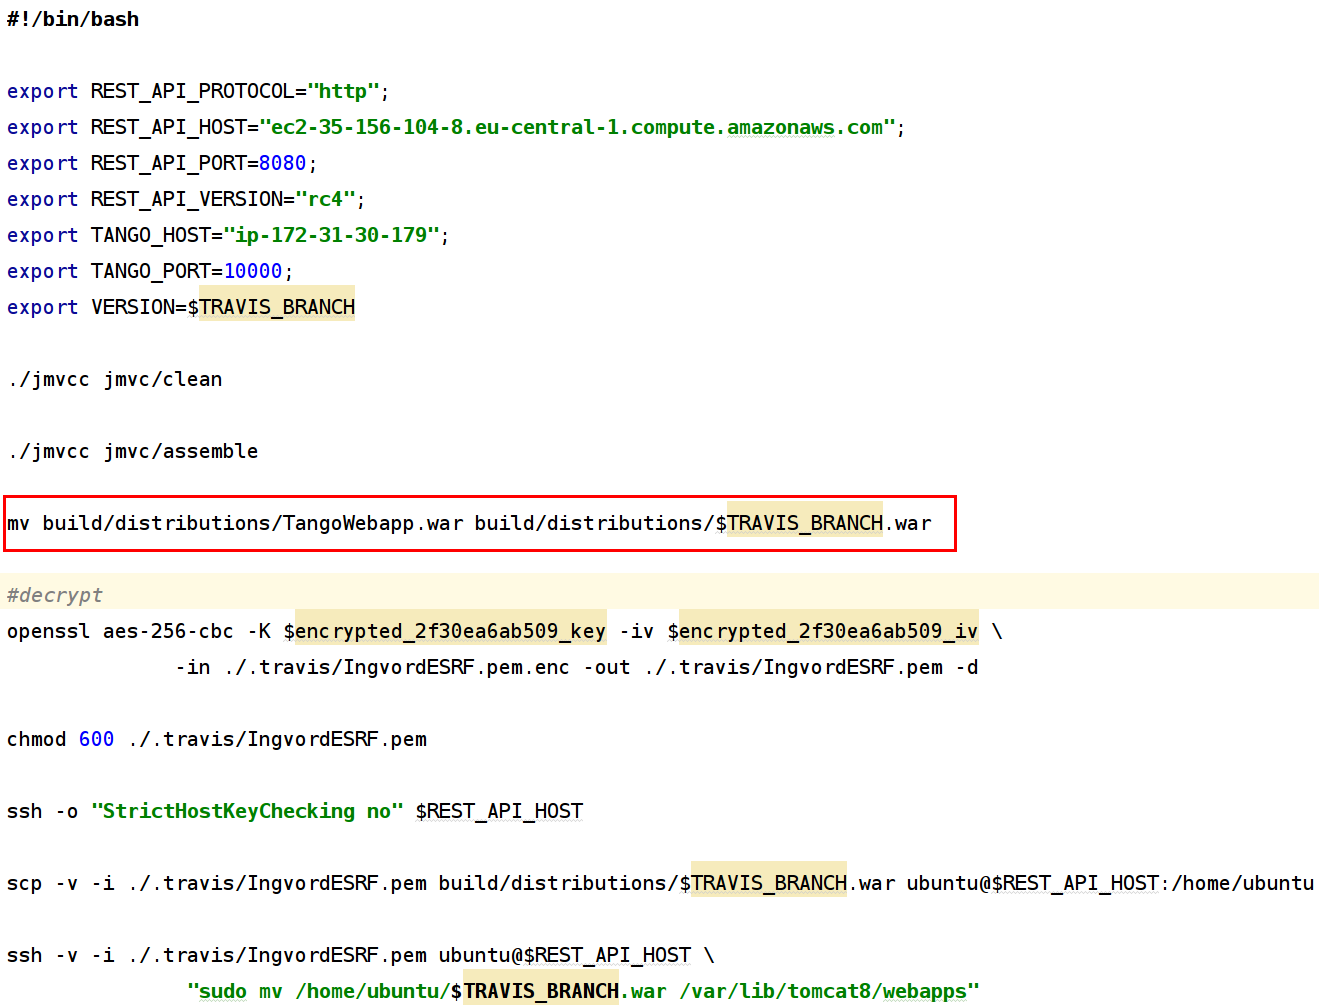
NOTE: in the script above resulting .war file is renamed after current repository branch name.
Refer to packaging application and continous intergation sections for more details.
//TODO
Waltz_code_webixProtoUI+composition.png Waltz_extention.png Waltz_high_level_module_diagram.png Waltz_jar_distribution.png Waltz_module_diagram.png Waltz_packaging.png Waltz_packaging1.png
Waltz_war_distribution.png Waltz_code_data_binding.png
Waltz_code_JSDoc.png
Waltz_code_platformAPI_StatefulMixin.png
Resources
[1] Exploring JS
[2] Waltz platform API references