Installation and tutorial
Prerequisites
- Install OpenJDK-8 -- Java Development Kit. For Debian/Ubuntu:
$> sudo apt-get install openjdk-8-jdk
...
$> java -version
openjdk version "1.8.0_162"
OpenJDK Runtime Environment (build 1.8.0_162-8u162-b12-1~bpo8+1-b12)
OpenJDK 64-Bit Server VM (build 25.162-b12, mixed mode)
I. mTangoREST.server installation guide
If you use Windows, visit Tango docs page with Waltz (ex. TangoWebapp) installation tutorial
If you use Linux, follow next steps.
- Download mTangoREST.server-rc4-2.7.jar. Save it in folder where you keep your Tango server executable files (possibly where Starter device can find it), e.g. /home/user/bin.
- Next to the downloaded .jar create a bash script with the name TangoRestServer (this name is important for the future integration with Astor and other Tango tools) and put there
#!/bin/bash

echo "Using TANGO_HOST=$TANGO_HOST"

USERNAME=`whoami`
echo "Using USERNAME=$USERNAME"

#enable debug
JAVA_OPTS="-Xmx4G -Xshare:off -XX:+UseG1GC -agentlib:jdwp=transport=dt_socket,server=y,suspend=n,address=5009"
echo "Using JAVA_OPTS=$JAVA_OPTS"

/usr/bin/java -jar $JAVA_OPTS -DTANGO_HOST=$TANGO_HOST /home/$USERNAME/bin/mtangorest.server-rc4-2.7.jar -nodb -dlist test/rest/0
- To make this file executable, in Terminal go to the folder and execute
$> chmod 777 TangoRestServer
- Start Tango REST Server by
$> ./TangoRestServer
- To test, open new Terminal and execute
curl -u "tango-cs:tango" http://localhost:10001/tango/rest/rc4
II. Waltz (ex. TangoWebapp) installation guide
-
Download and extract Apache Tomcat 8.5.31 (.zip – for Windows, .tar.gz – for Linux) in your folder with REST.
-
Download .war file of Waltz v0.4.2 into /home/user/bin/apache-tomcat-8.5.31/webapps/
-
Start Tomcat in Terminal
$> cd apache-tomcat-8.5.31/bin/
$> ./startup.sh
- Open browser and go to http://localhost:8080/TangoWebapp
- login: tango-cs
- pass: tango
Get an error because have to connect to Tango Controls.
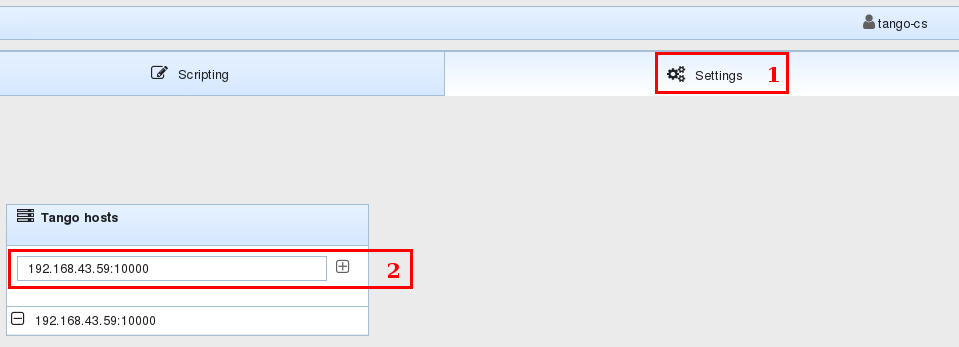
- Set a valid Tango Host. In Waltz go to Setting tab (1) -> Tango hosts box -> put your Tango host -> press "+" (2)
III. IDE Setup
This section describes how to setup IntelliJ IDEA Ultimate for developing using Waltz (ex. TangoWebapp) platform. Setup for other IDEs should be the same in general.
- Clone Waltz (ex. TangoWebapp):
$> git clone git@github.com:tango-controls/tango-webapp.git
OR using https (if you have no github account):
$> git clone https://github.com/tango-controls/tango-webapp.git
This will create tango-webapp folder in the current folder.
-
Open intelliJ IDEA and start a new project using existing source (File -> New -> Project from existing source...) and choose cloned tango-webapp folder.
-
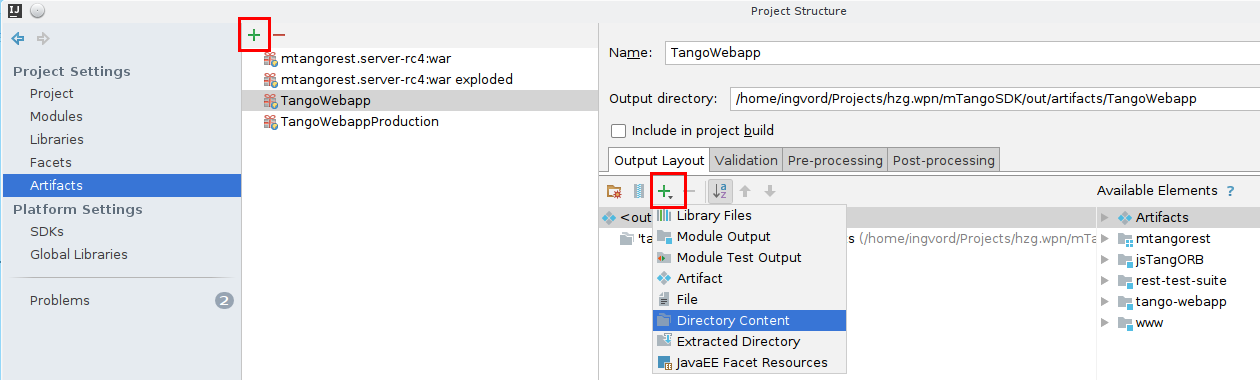
Add an artifact to your project: File -> Project Structure...
Add a new artifact "+" -> Web Application: Exploded and add tango-webapp as Directory content to the artifact:
- Once new project has been created let's setup Apache Tomcat. Select Run -> Edit configurations...
Add a new local Tomcat run configuration:
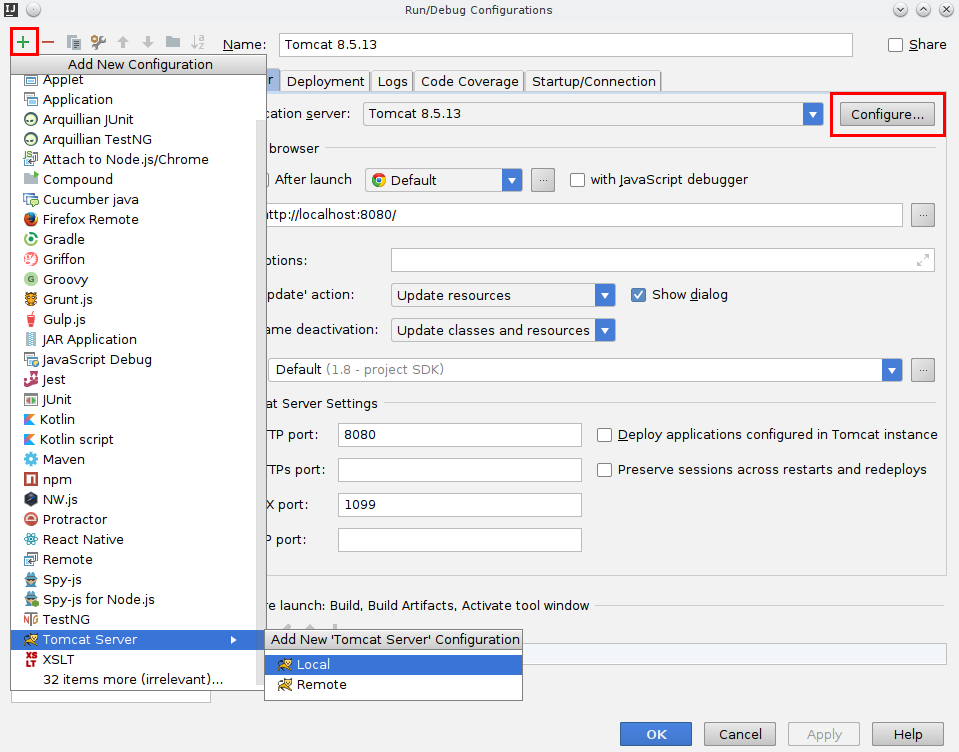
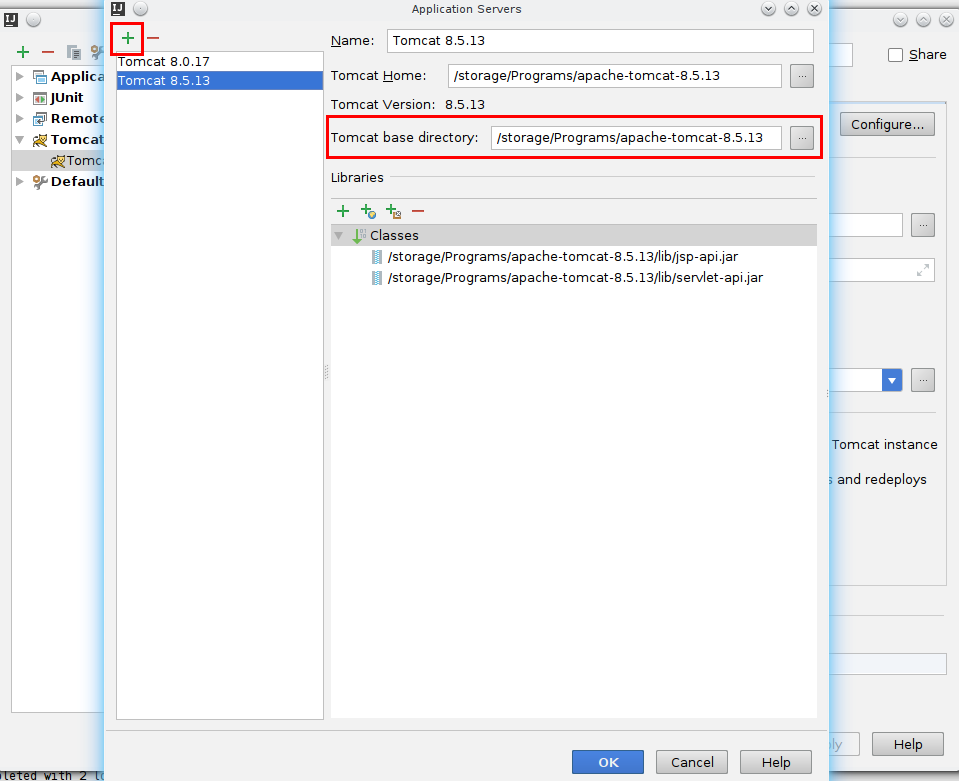
Setup a new Tomcat application server - just add Apache Tomcat base folder (the one you extracted in I. mTangoREST.server installation guide)
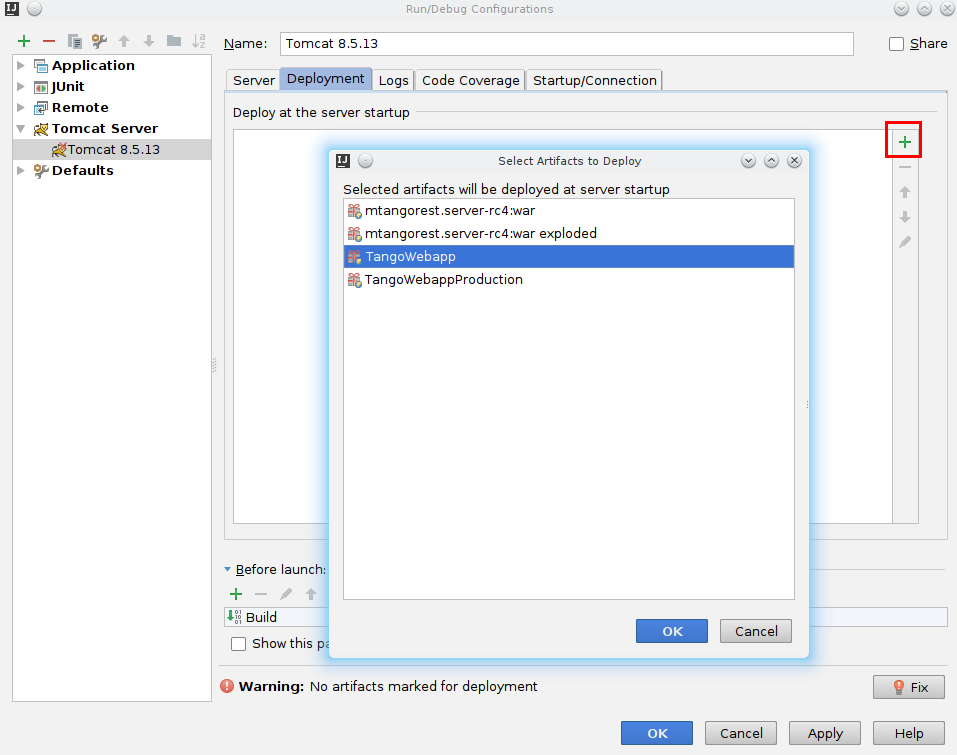
Next you need to add TangoWebapp artifact to Tomcat: open Deployment tab and add artifact:
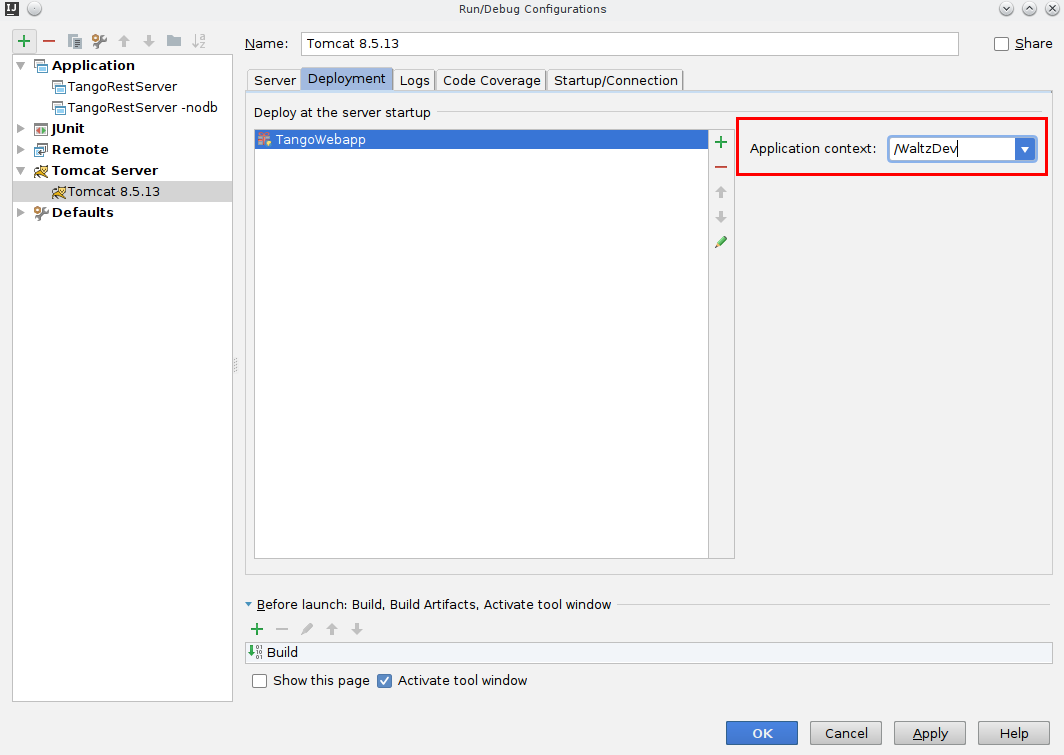
Set context - this is what defines URL at which Waltz will be accessible e.g. http://localhost:8080/WaltzDev:
Finally switch back to Server tab and choose Update classes and resources on Frame deactivation:
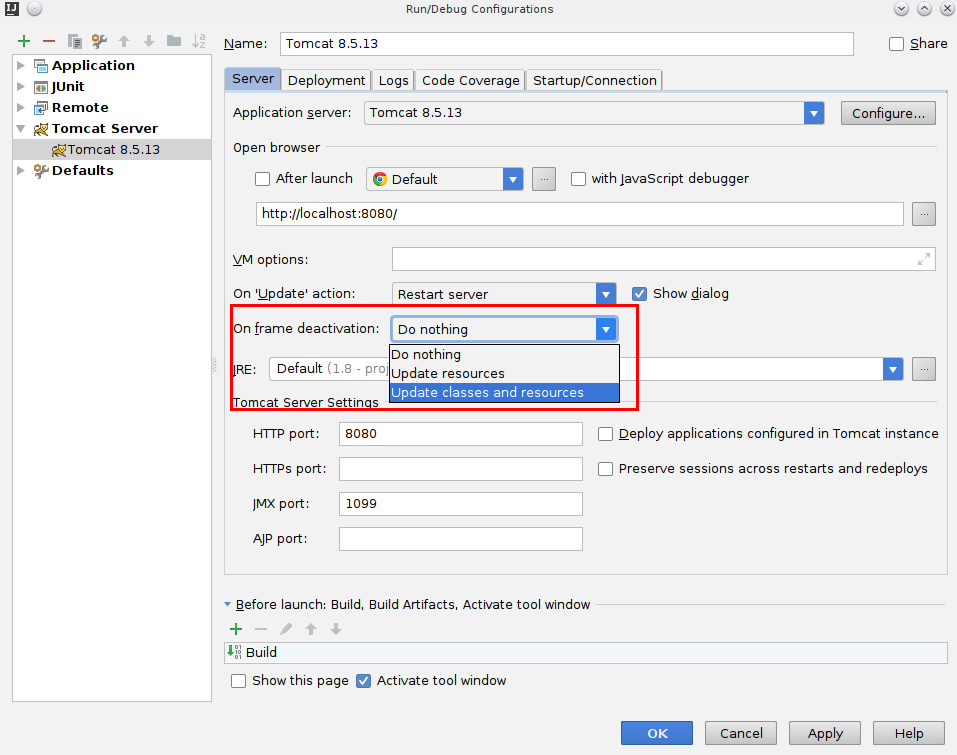
the later will allow source update on the fly i.e. changes to .js files will be fetched by Tomcat automatically once you switch to the browser.
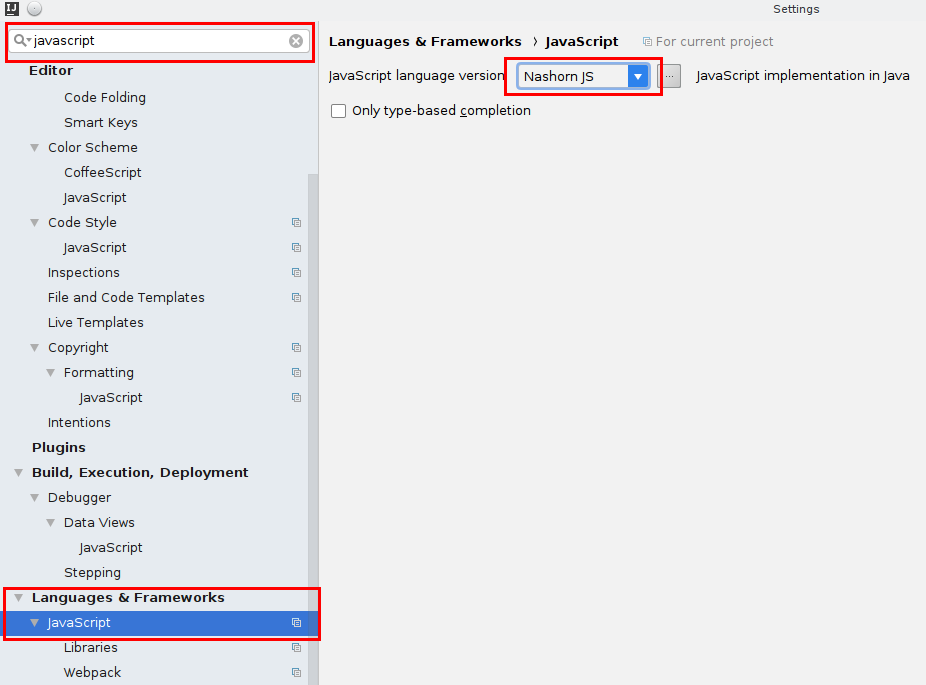
- Finally set JavaScript language flavour to Nashorn: File -> Settings... -> put javascript into search box -> Languages & Frameworks -> JavaScript -> select Nashorn JS in the drop-down list
Now IntelliJ IDEA is ready for development.
More information:
Tango Controls docs - Tango REST API